VPS 3: Coolify
Posted on January 30, 2025 • 5 minutes • 933 words • Other languages: Español
This is the third part of my VPS blog series . Some screenshots shown here are from Coolify Crash Course | Self Host 101 | Secure Set up .
- What Is Coolify? (And Why Choose It?)
- Install Coolify
- Initial Setup
- Configure HTTPS And Domains
- Server Proxy Configuration
- Create A Firewall
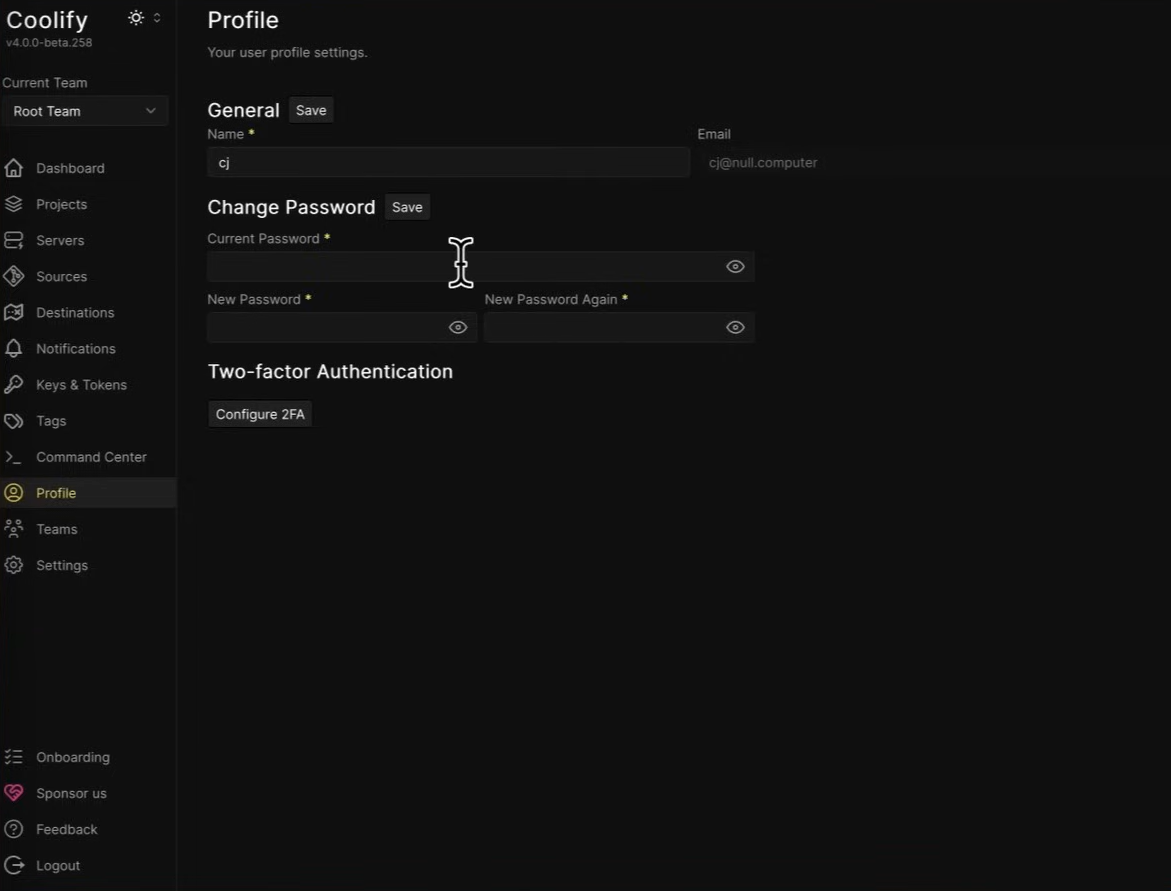
- Enable Two-Factor Authentication (2FA)
- Next Lecture
What Is Coolify? (And Why Choose It?)
Coolify is an open-source, self-hostable platform-as-a-service (PaaS) that lets you deploy and manage web apps, databases, and services directly on your own server. Think of it as a self-hosted Heroku alternative—but without vendor lock-in or surprise bills.
Key Features
- One-click deployments: Launch apps from Git repositories, Docker images, or pre-built templates.
- Full ownership: Host everything on your VPS, with no third-party dependencies.
- Multiserver support: Manage apps across multiple servers from a single dashboard.
- Automated HTTPS: Built-in Let’s Encrypt integration for free SSL certificates.
- Docker-native: Works seamlessly with Docker containers.
Why Coolify Over Alternatives?
- Simplicity vs. control: Tools like Heroku or Render simplify deployments but limit customization. Coolify gives you ease while retaining full server control.
- Cost-effective: Unlike paid platforms, Coolify is 100% free and open-source. You pay only for where you run it (your VPS).
- Avoid Kubernetes complexity: For small-to-medium projects, Kubernetes (k8s) is overkill. Coolify offers lightweight orchestration without the steep learning curve.
Install Coolify
First, log in to your VPS as the root user and run the official Coolify installation script :
curl -fsSL https://cdn.coollabs.io/coolify/install.sh | bash
This script installs all dependencies and starts Coolify automatically. Once complete, you’ll see a confirmation that Coolify is running at http://<your-server-ip>:8000.
Initial Setup
Access The Dashboard
Open your browser and navigate to http://<your-server-ip>:8000. You’ll see the Coolify setup screen:
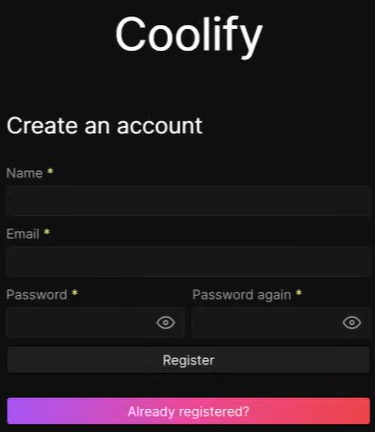
- Enter a name, email, and password.
- Click Register.
Choosing Your Server Type
After logging in, you’ll be prompted to set up your server:

- Localhost: This refers to the same VPS where Coolify is installed. Ideal for testing or lightweight workloads, but not recommended for production (high server load could crash the Coolify dashboard).
- Remote Server: Use this if you want Coolify to manage a separate VPS (better for production resilience).
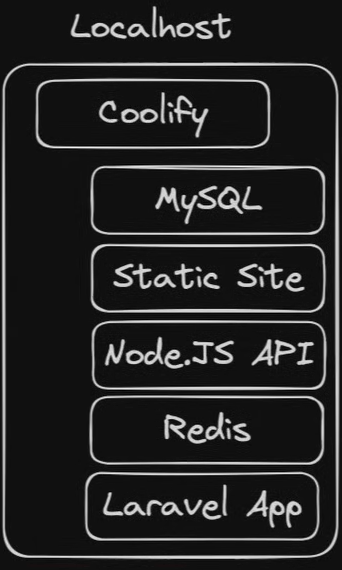
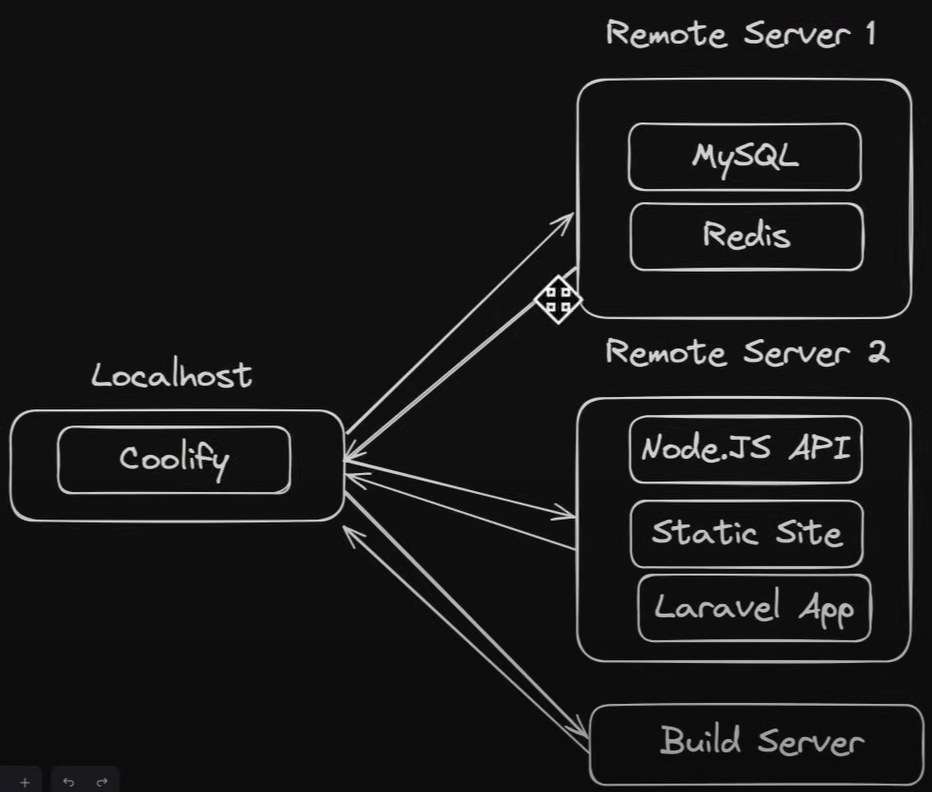
For this blog series, we’ll use Localhost for simplicity.
Configure HTTPS And Domains
DNS Records Setup
To secure Coolify with HTTPS and assign a domain: Create two DNS A records for your domain (e.g., apps.yourdomain.com):
- Wildcard subdomain: * →
<your-server-ip> - Apex domain: @ →
<your-server-ip>
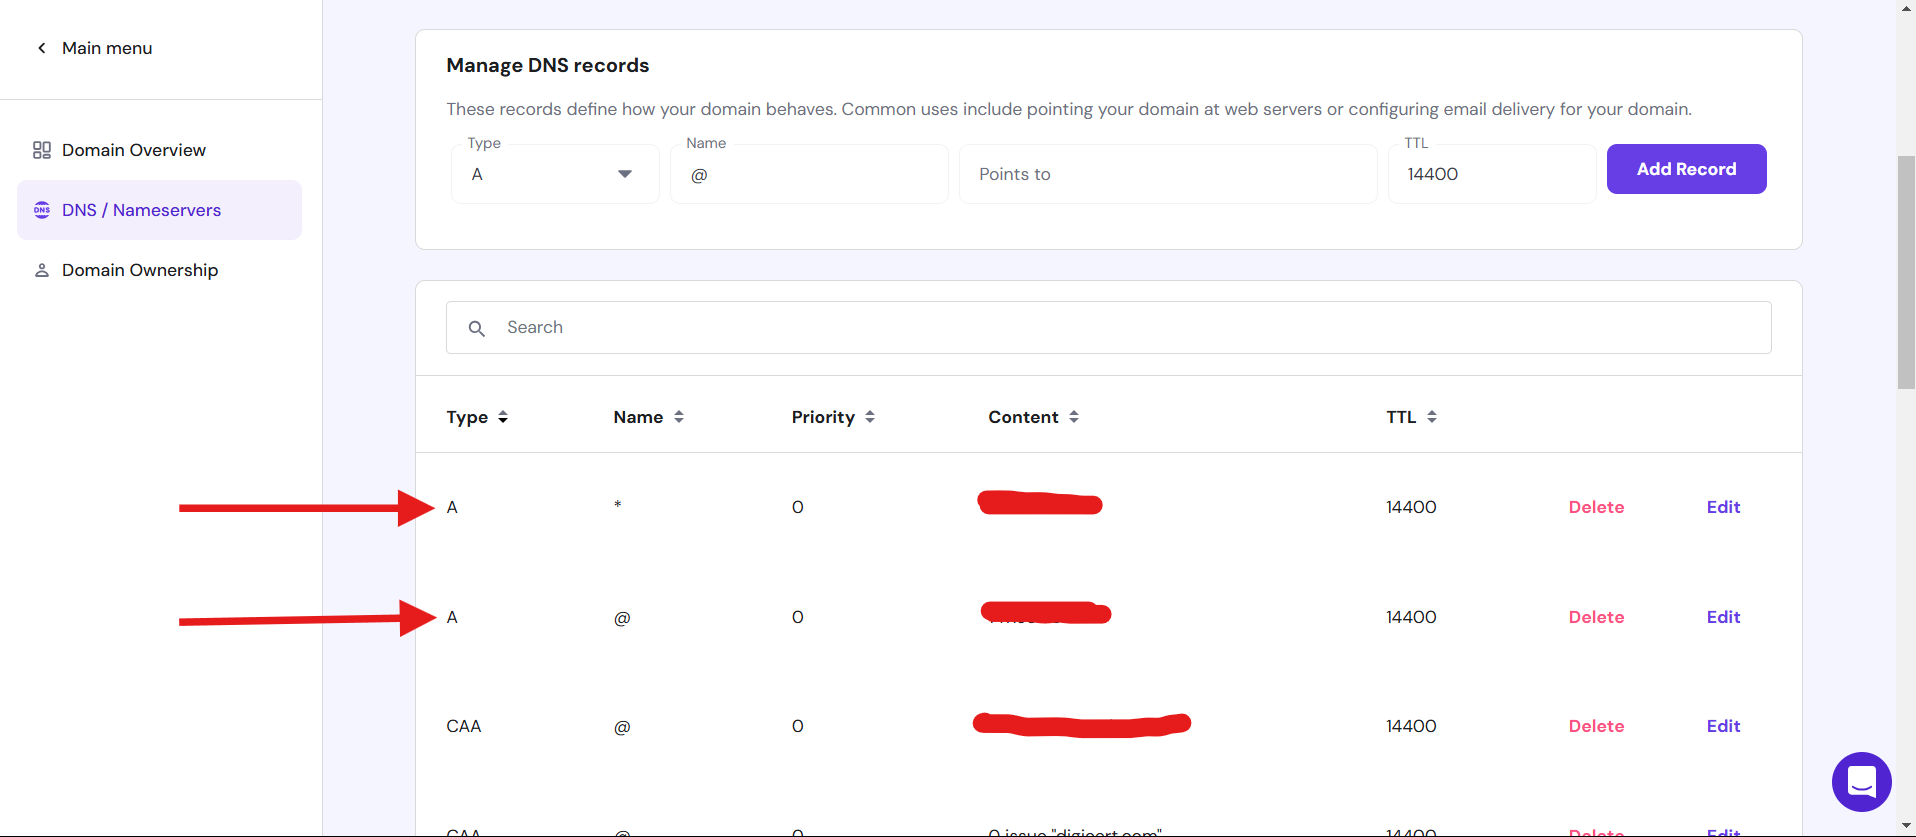
This allows any subdomain (e.g., coolify.apps.yourdomain.com) to resolve to your server.
Coolify Instance Domain
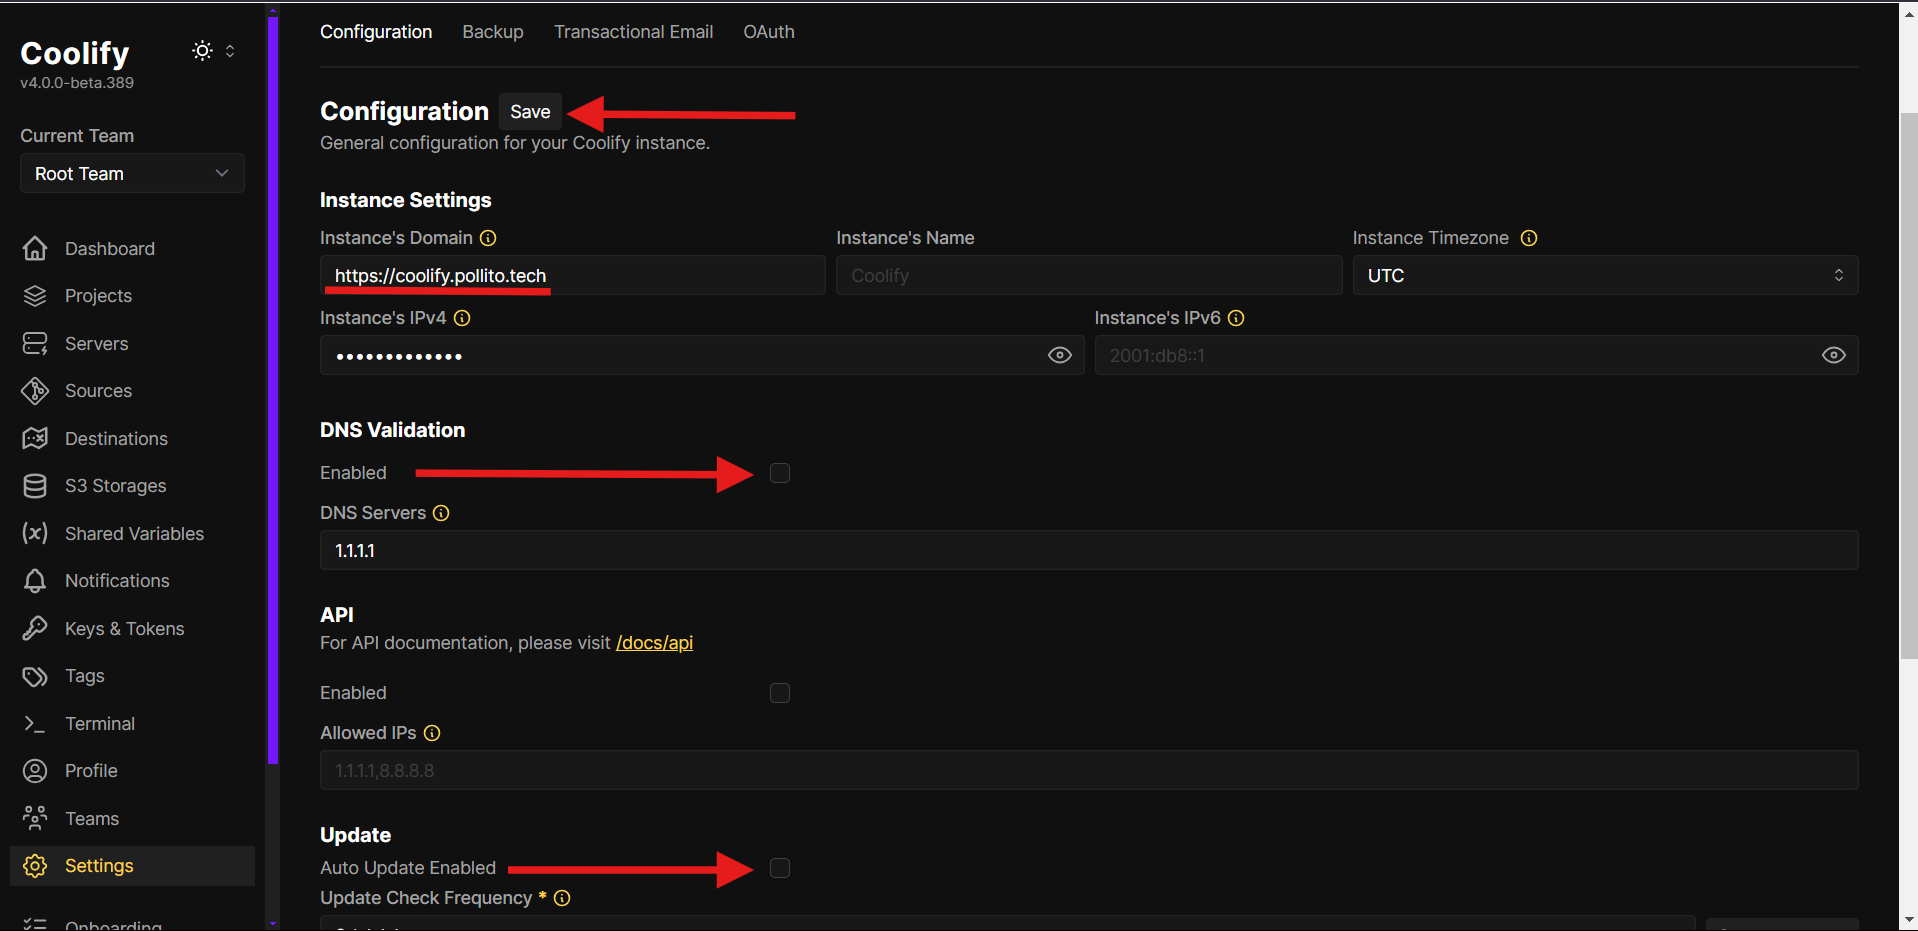
In Coolify’s Settings → Configuration, set:
- Instance domain:
https://coolify.apps.yourdomain.com(replace with your domain). - Uncheck “Validate DNS” as it may not work properly in some cases.
- Uncheck “Auto Update Enabled” (manual updates are recommended).
- Save changes.
Wildcard Domain For Apps
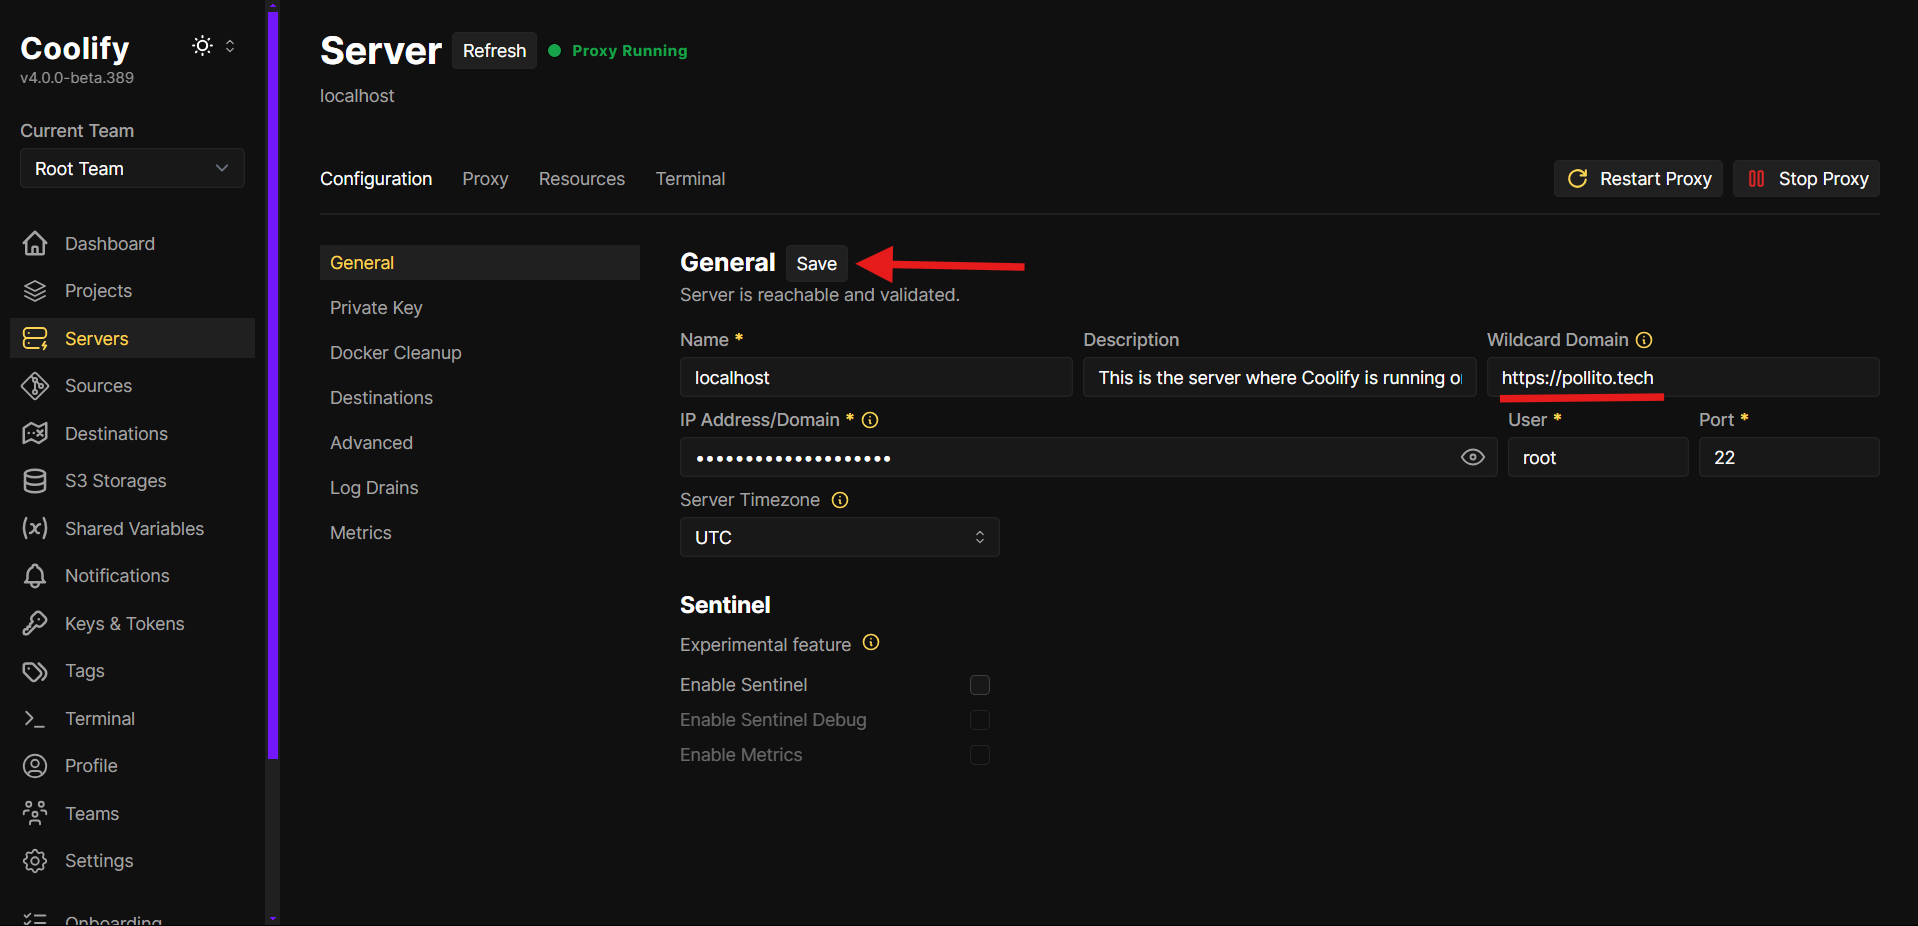
- Navigate to
Servers → Localhost → Configuration. - Under “Wildcard Domain”, enter your root domain (e.g.,
https://apps.yourdomain.com). - Save to enable automatic subdomain routing for future apps.
Server Proxy Configuration
Ensure your VPS still allows connection through ports 80/443 before this step! Switching proxy will temporarily disable access over HTTPS.
- So far we haven’t set up any firewall rules, so we should be good to go.
Switch To Caddy Proxy
By default, Coolify uses Traefik . It is a totally valid option, but in this VPS series we’ll switch to Caddy because of its simpler configuration:
- Go to
Servers → Localhost → Proxy. - Stop the current proxy.
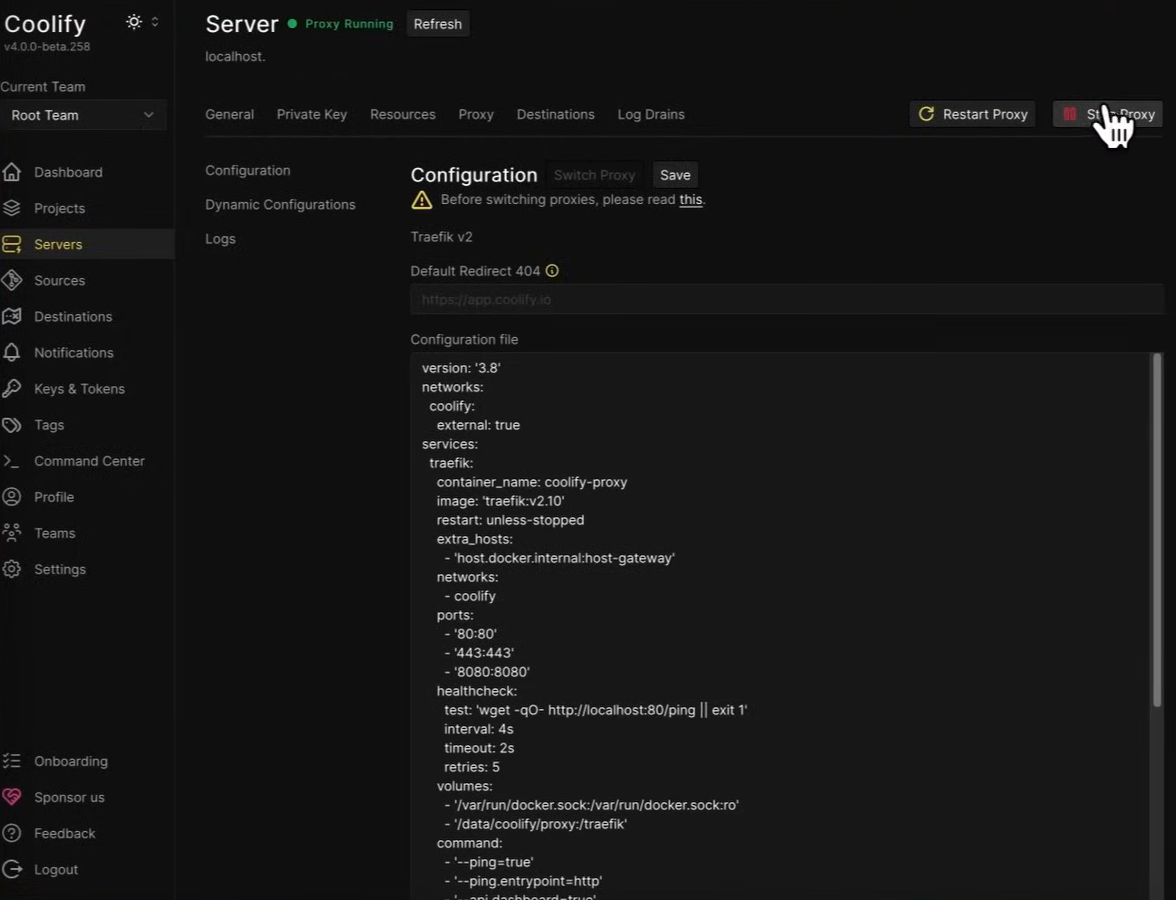
- Switch Proxy and select Caddy.
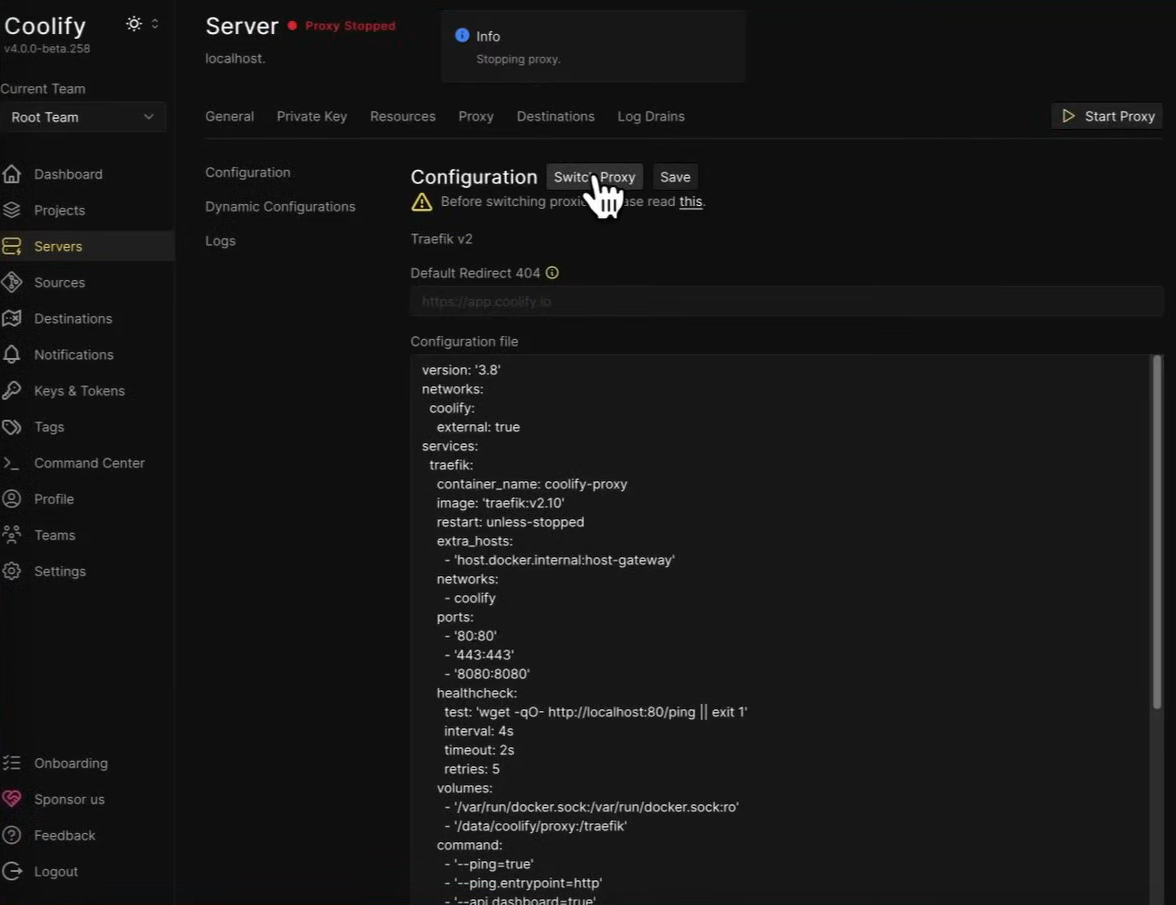
- Restart the proxy.
Visit https://coolify.apps.yourdomain.com. If the login page loads, your setup was successful!
Redirect www To Your Canonical Domain
Enforce consistency by redirecting www to your canonical domain.
- Go to
Servers → Localhost → Proxy -> Dynamic Configurations. - Click Add Configuration and name it (e.g.,
www_redirect.caddy). - Paste this configuration (replace
coolify.apps.yourdomainwith your domain):www.coolify.apps.yourdomain { redir https://coolify.apps.yourdomain{uri} permanent } - Restart the proxy.
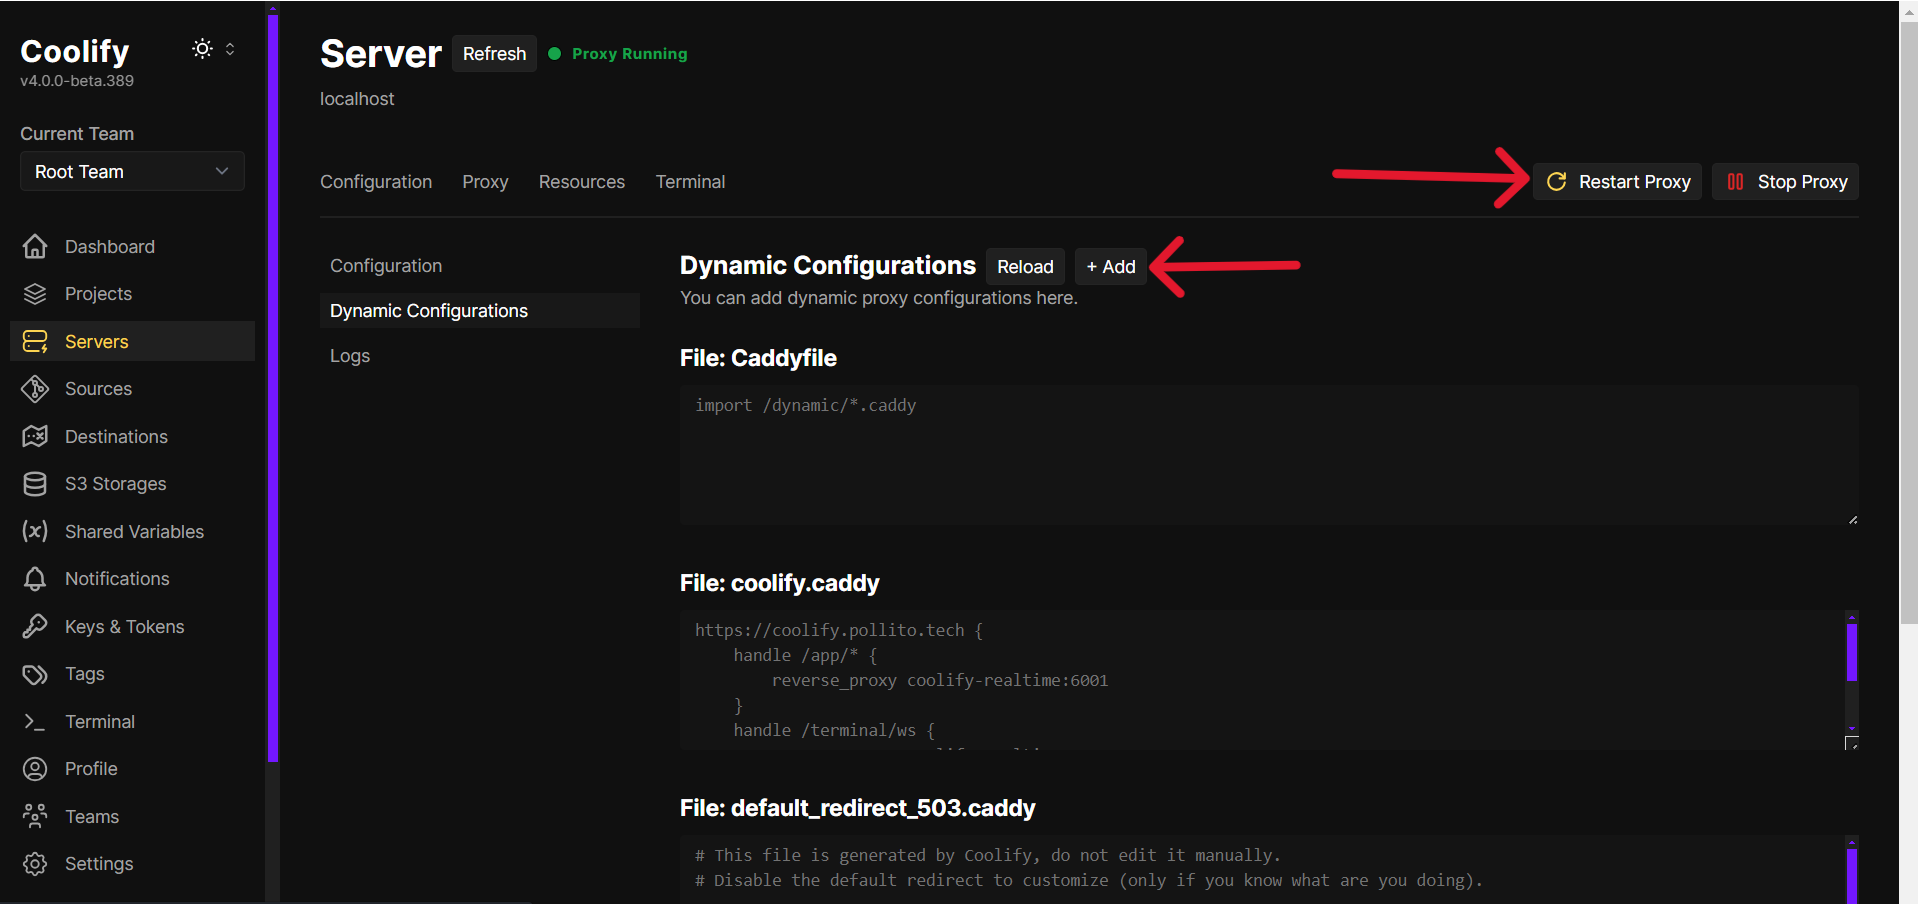
Test by visiting www.your-coolify-domain.com. It should redirect seamlessly.
Create A Firewall
Now that Coolify is accessible via HTTPS, it’s critical to lock down unnecessary ports to minimize attack vectors.
Create The Rules
- Access Your VPS Firewall Dashboard: Most VPS providers have a built-in firewall tool.
- Allow Critical Ports by creating rules to permit traffic for:
- SSH (Port 22): Mandatory for server access. (If you’ve changed your SSH port, use that instead).
- HTTP (Port 80).
- HTTPS (Port 443).
- Deny All Other Ports. By default, firewalls block all traffic not explicitly allowed.
- Apply the firewall.
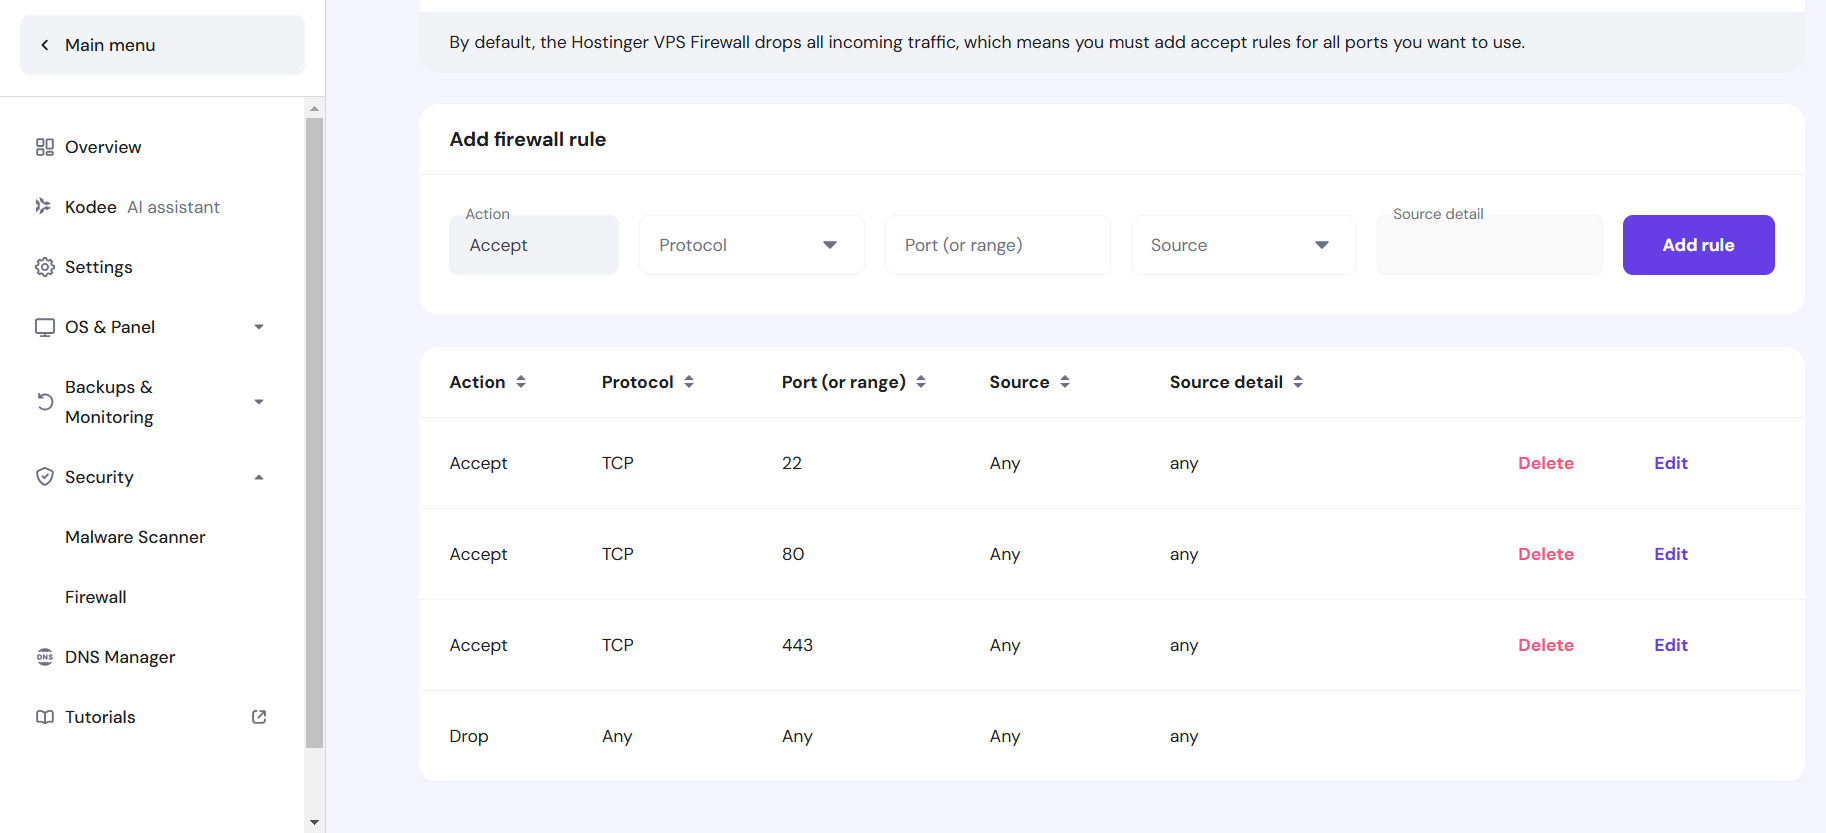
Verify The Configuration
- Test blocked ports: Try accessing Coolify via its old HTTP port (e.g.,
http://<your-server-ip>:8000). The connection should fail, confirming the firewall is active. - Confirm HTTPS access: Visit
https://coolify.yourdomain.com. The dashboard should load normally, proving traffic is now funneled exclusively through secure ports.
Enable Two-Factor Authentication (2FA)
Now that your Coolify instance is secured behind HTTPS and a firewall, let’s add a critical layer of account protection: two-factor authentication (2FA).
Why Enable 2FA?
- Brute-Force protection: Without 2FA, attackers could guess weak passwords through repeated login attempts.
- Defense in depth: Even if your password is compromised, 2FA blocks unauthorized access.
- Critical for public-facing dashboards: Essential for any service exposed to the internet.
Set Up 2FA In Coolify
- Access security settings: In
Profile → Two-factor Authentication. - Enable 2FA: Scan the QR code with an authenticator app.
- Save recovery codes: Coolify will generate one-time recovery codes. Store these securely.
- Confirm setup: Enter a 2FA code from your authenticator app to finalize activation.
