VPS 5: Deploying A Full-Stack App
Posted on February 3, 2025 • 9 minutes • 1799 words • Other languages: Español
- What Is “Roundest Pokémon”?
- What Are We Going To Need?
- Add PostgreSQL Resource
- pgAdmin
- Create A GitHub Application In Coolify
- Deploy Using GitHub App
- VPS Resource Usage
- A Heartfelt Conclusion To The VPS Journey
This is the fifth and last part of my VPS blog series .
What Is “Roundest Pokémon”?
“Roundest Pokémon” is a common programming exercise that consists of an interactive voting game to decide which Pokémon is the roundest.
We’re going to add a twist to it: the ability to choose which backend system processes the vote.
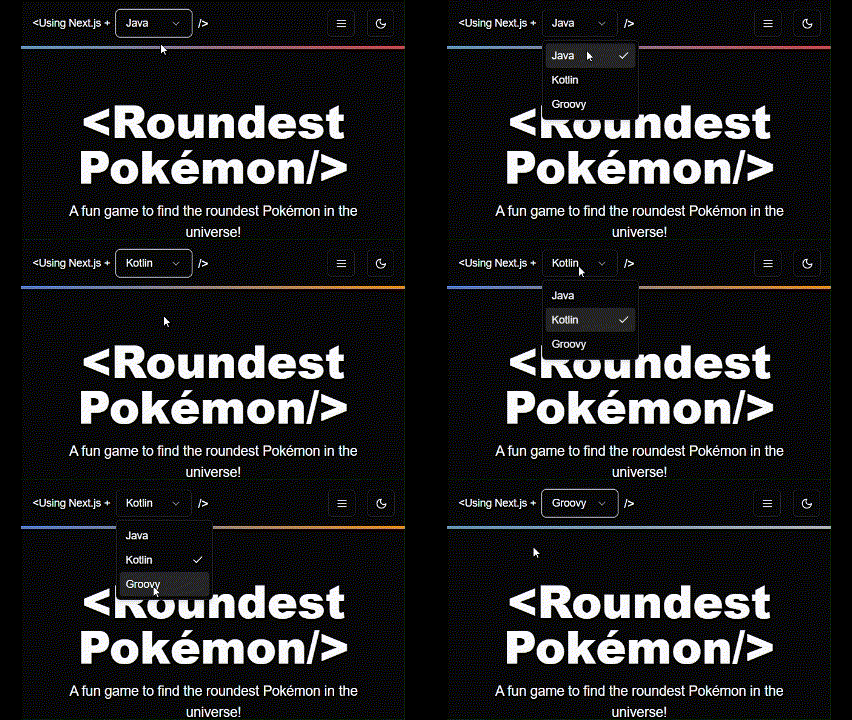
This feature will help us illustrate how different systems can be deployed and work together seamlessly, all deployed in the VPS under a Coolify project.
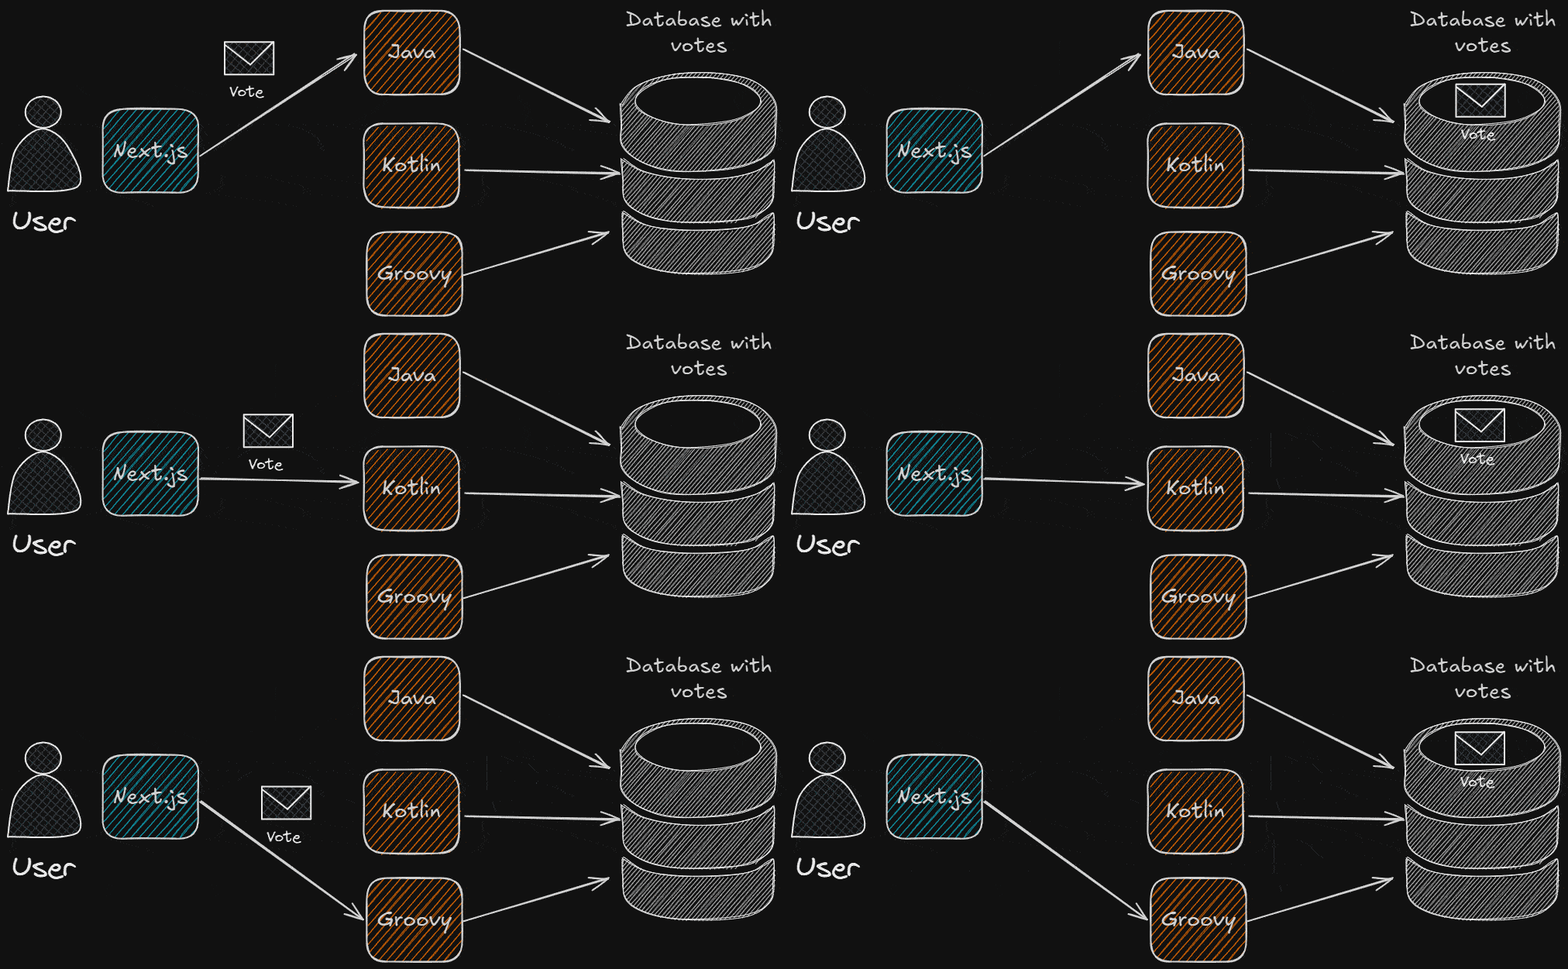
What Are We Going To Need?
- A database (I’m going with Postgres
)
- A database admin: Not crucial for the app itself, but needed to create and edit schemas if you don’t want to rely on Hibernate’s DDL Auto feature . I’m going to use pgAdmin .
- The frontend app (I used Next.js).
- The different backend apps:
I wrote all the apps. Blogs on them are coming up sometime in the future.
Add PostgreSQL Resource
- Create a New Project:
- Click Projects in the left menu.
- Click Add a new project.
- Name it “roundest_pokemon”.
- Click Create. You should have a “roundest_pokemon” project created.
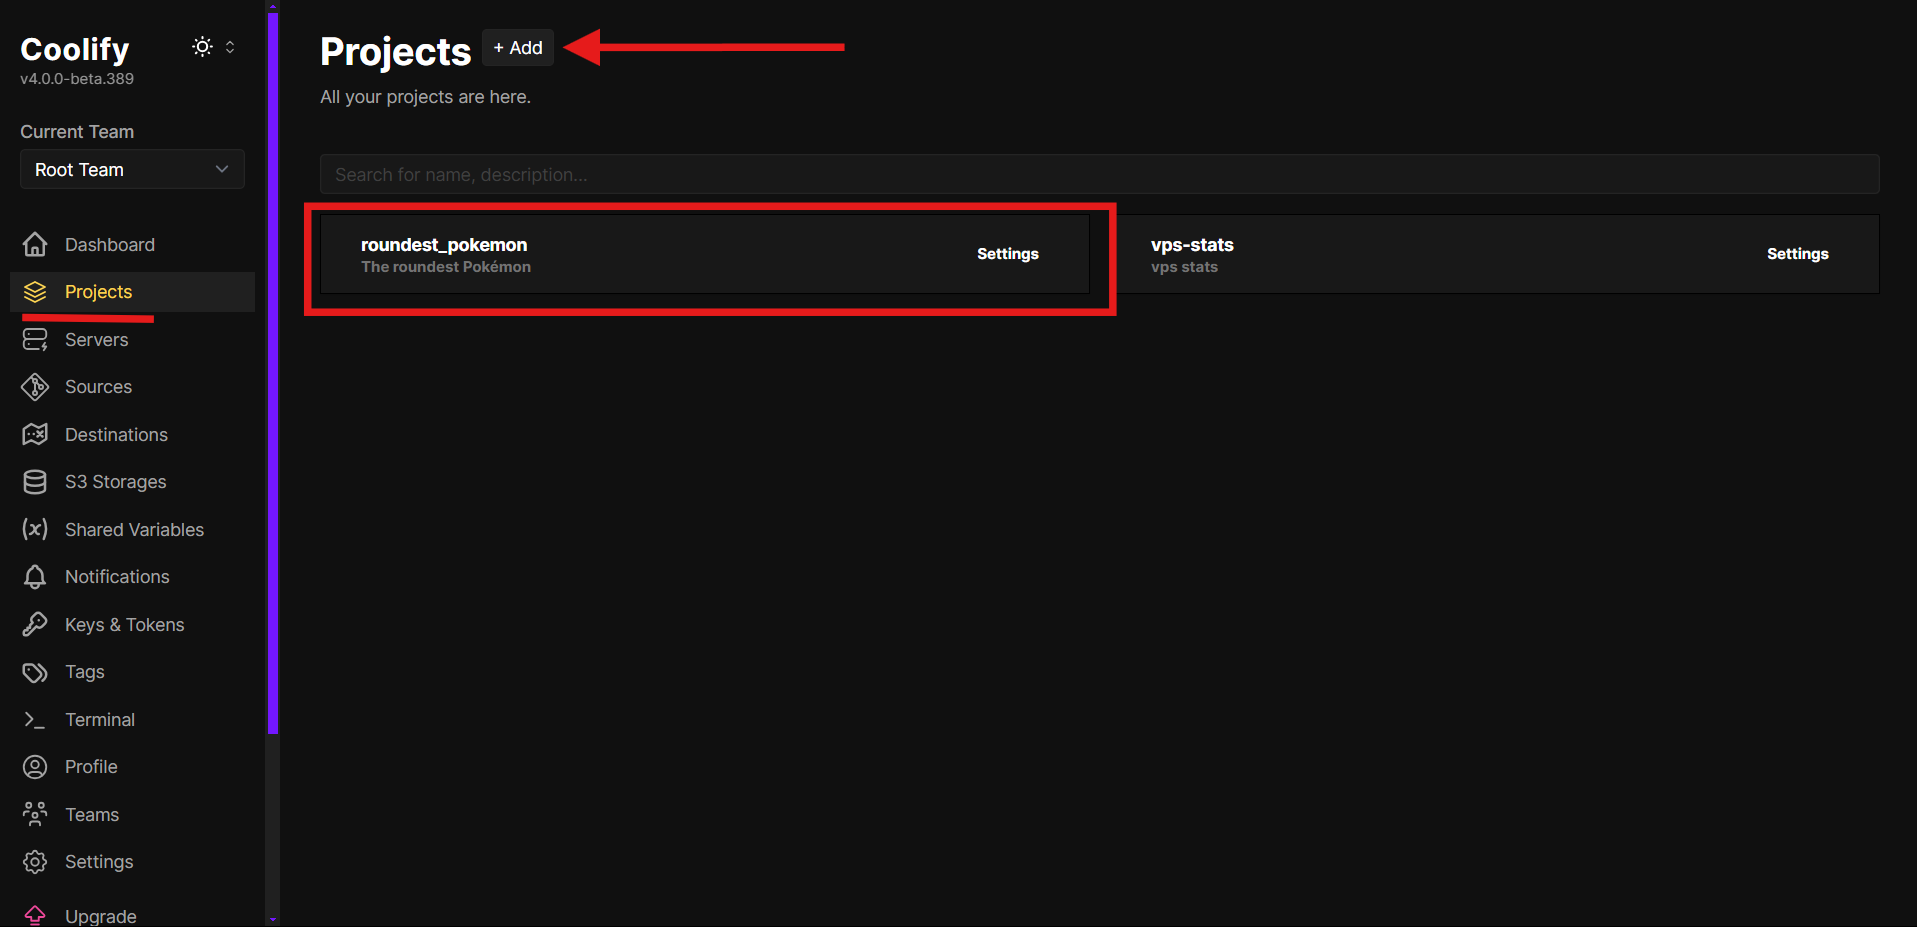
- Add a New PostgreSQL Resource:
- Go to your “roundest_pokemon” project.
- Click + New.
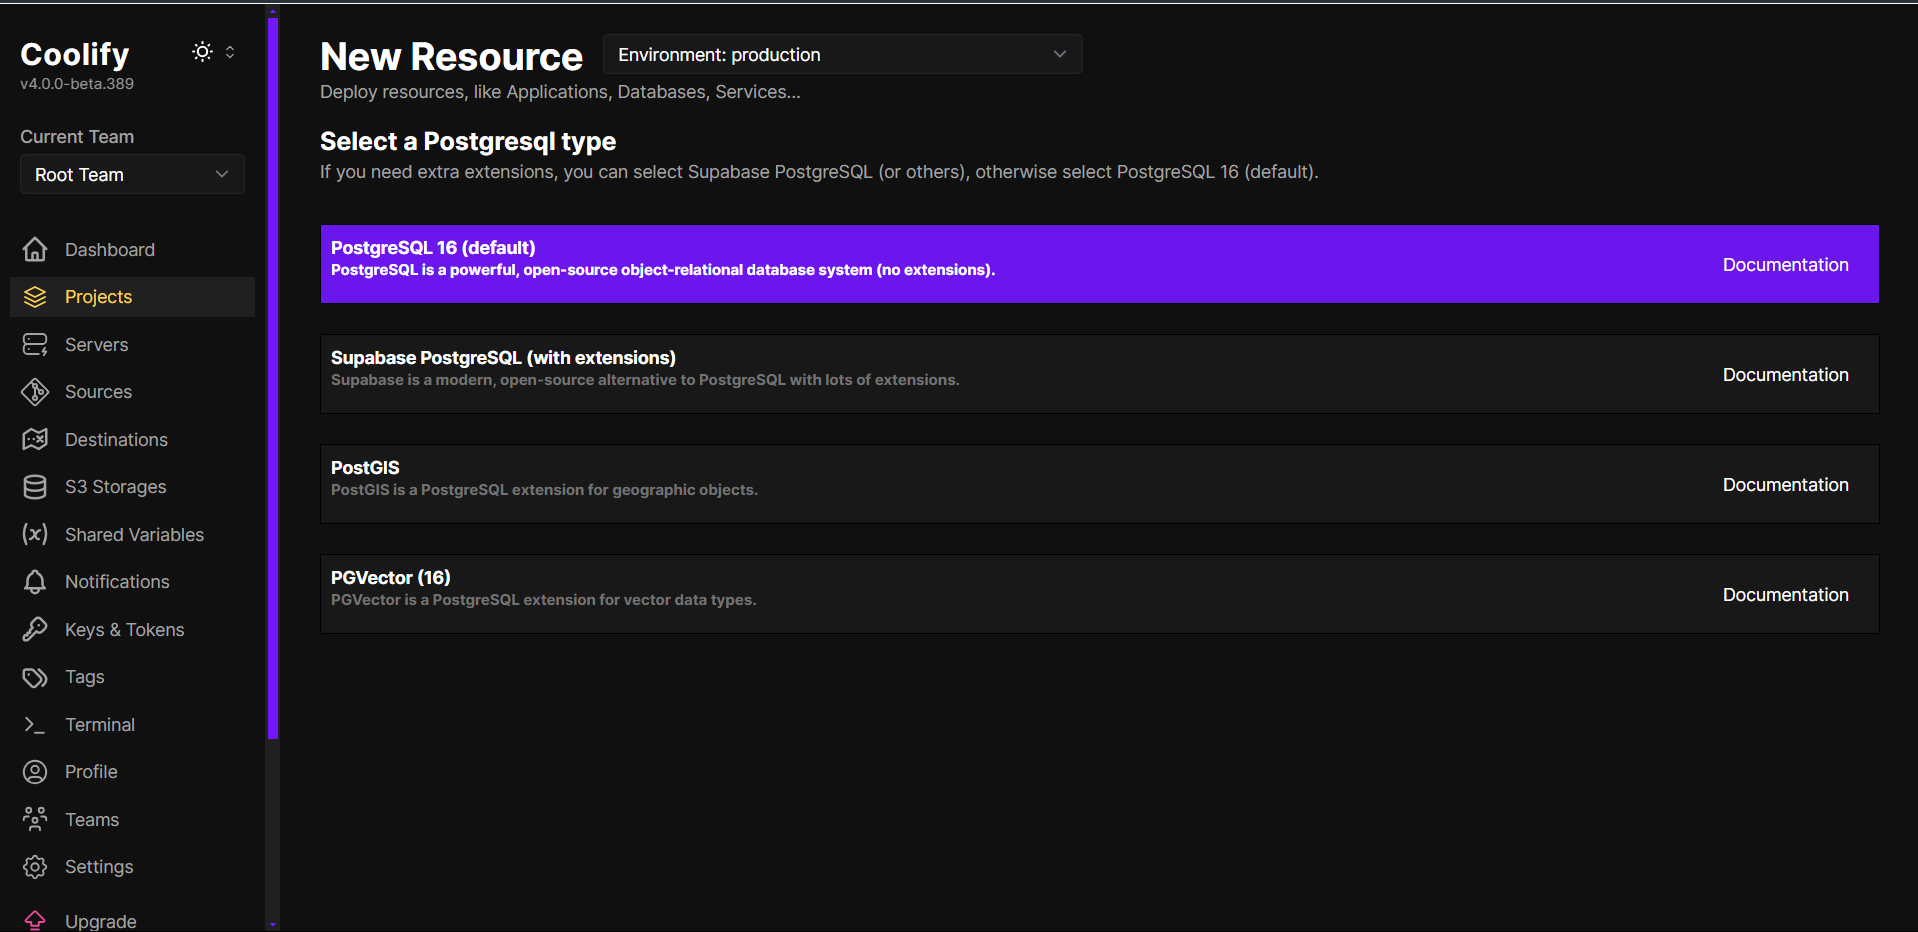
- Under Databases, select Postgres.
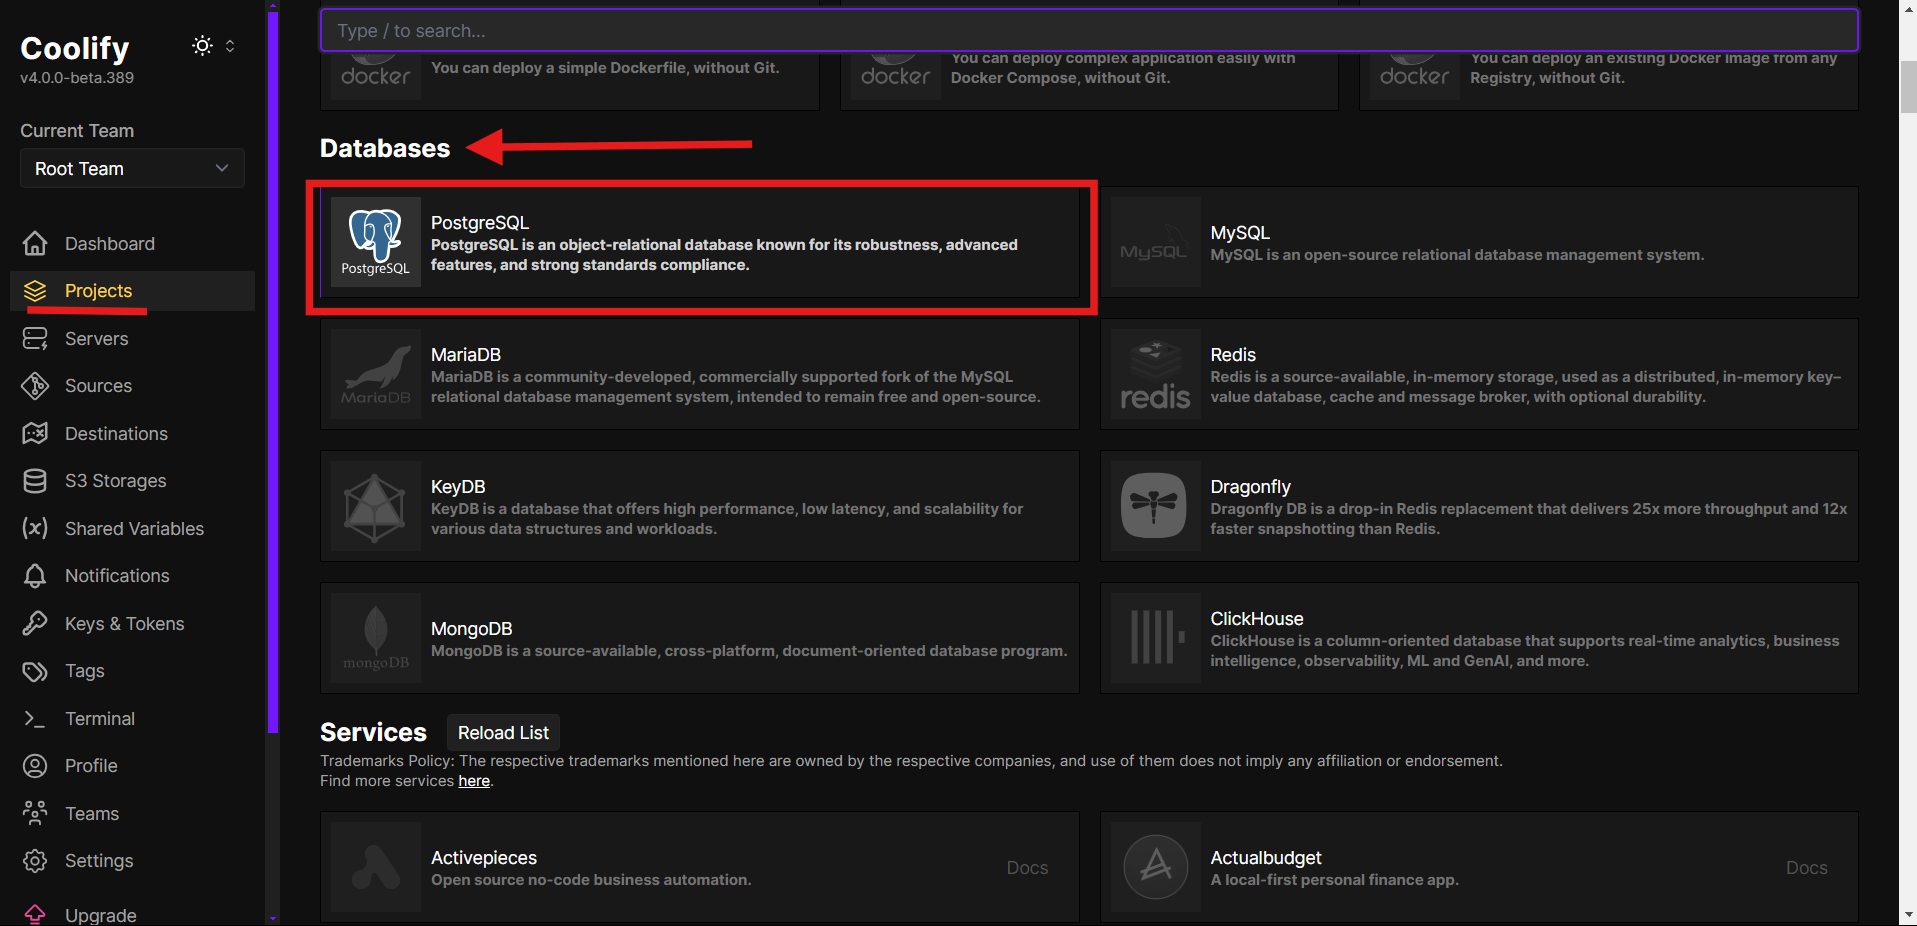
- Select the default option, as we just need a simple SQL database here.
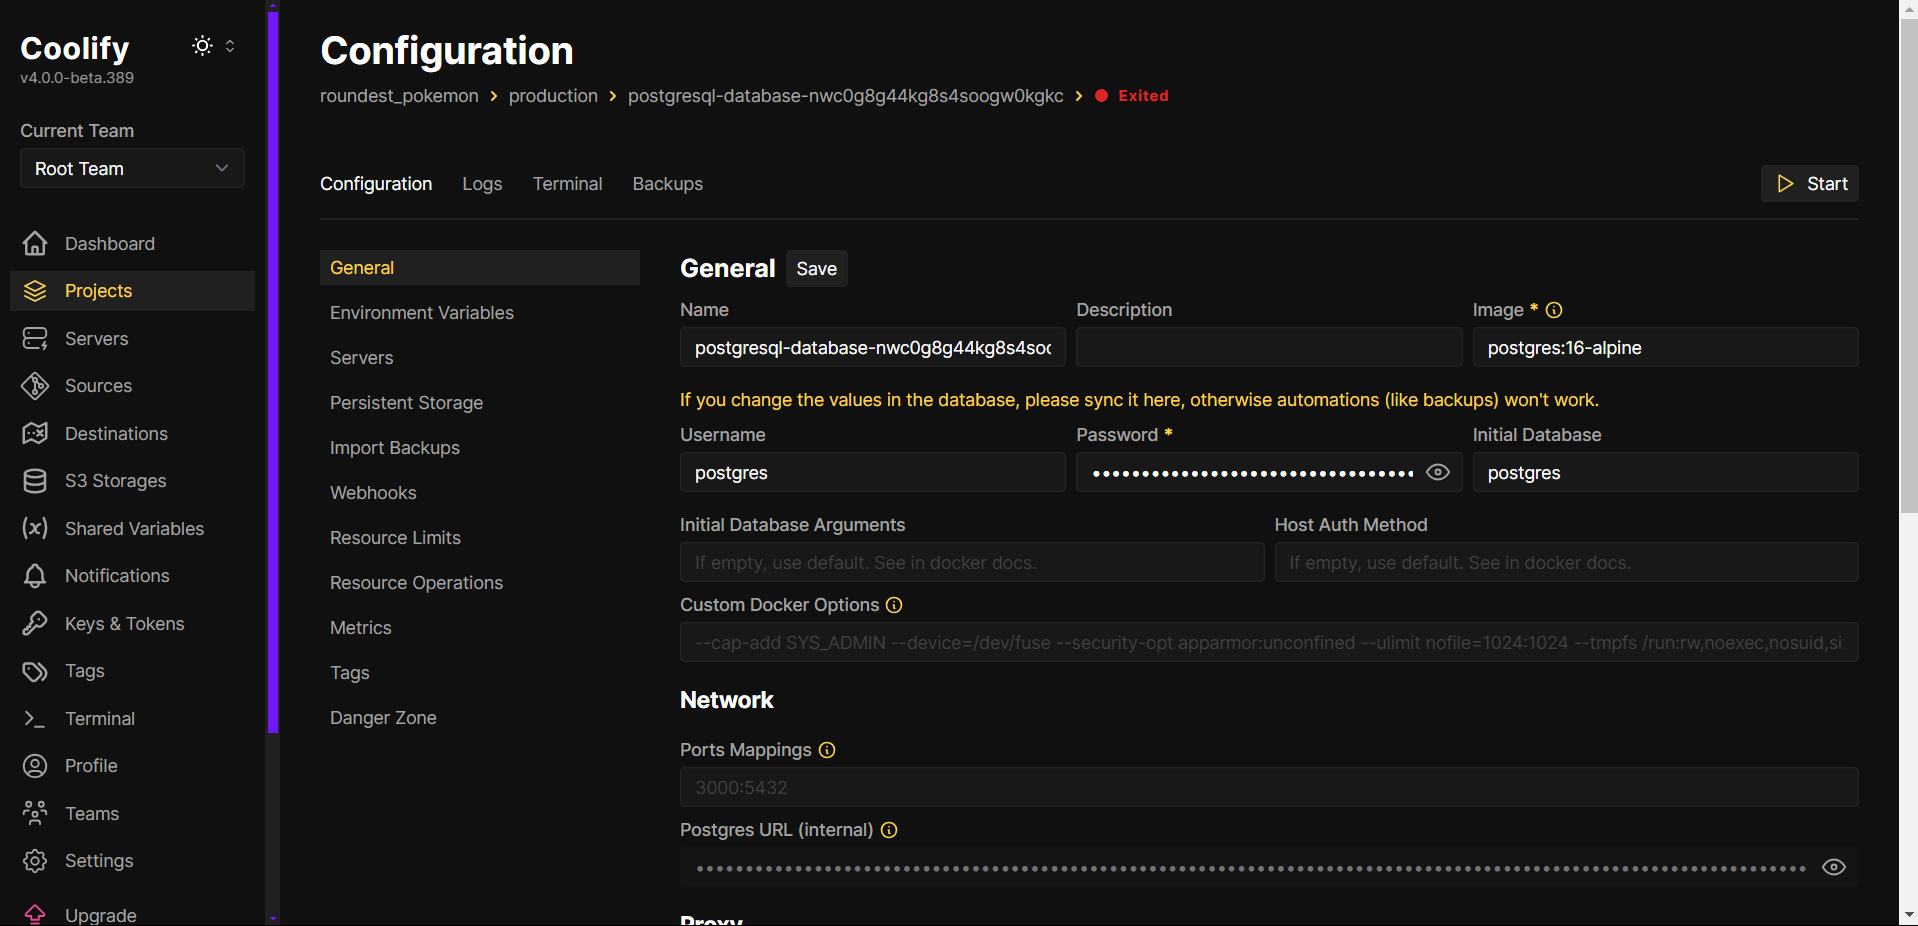
- Leave everything as default, click Start.
How can we manage the database?
- Exposing the database to the public internet: a totally valid option, but that would imply:
- Changing firewall configurations to expose a new port.
- Being at risk to brute force passwords attacks.
- Use a web-based interface to manage the database without exposing it publicly: keeps the database private while allowing to run queries inside the internal network.
Let’s go for the latter approach.
pgAdmin
Add The Docker Resource
-
Go to your “roundest_pokemon” project.
- Crucial to be inside the same project, if not, pgAdmin will not be able to reach the already created database.
-
Click + New.
-
Under Docker Based, select Docker Image.
-
You’ll be asked to prompt an image name. Put
dpage/pgadmin4and click Save. -
Give it a domain (like
https://pgadmin4.yourdomain.com) and click Save.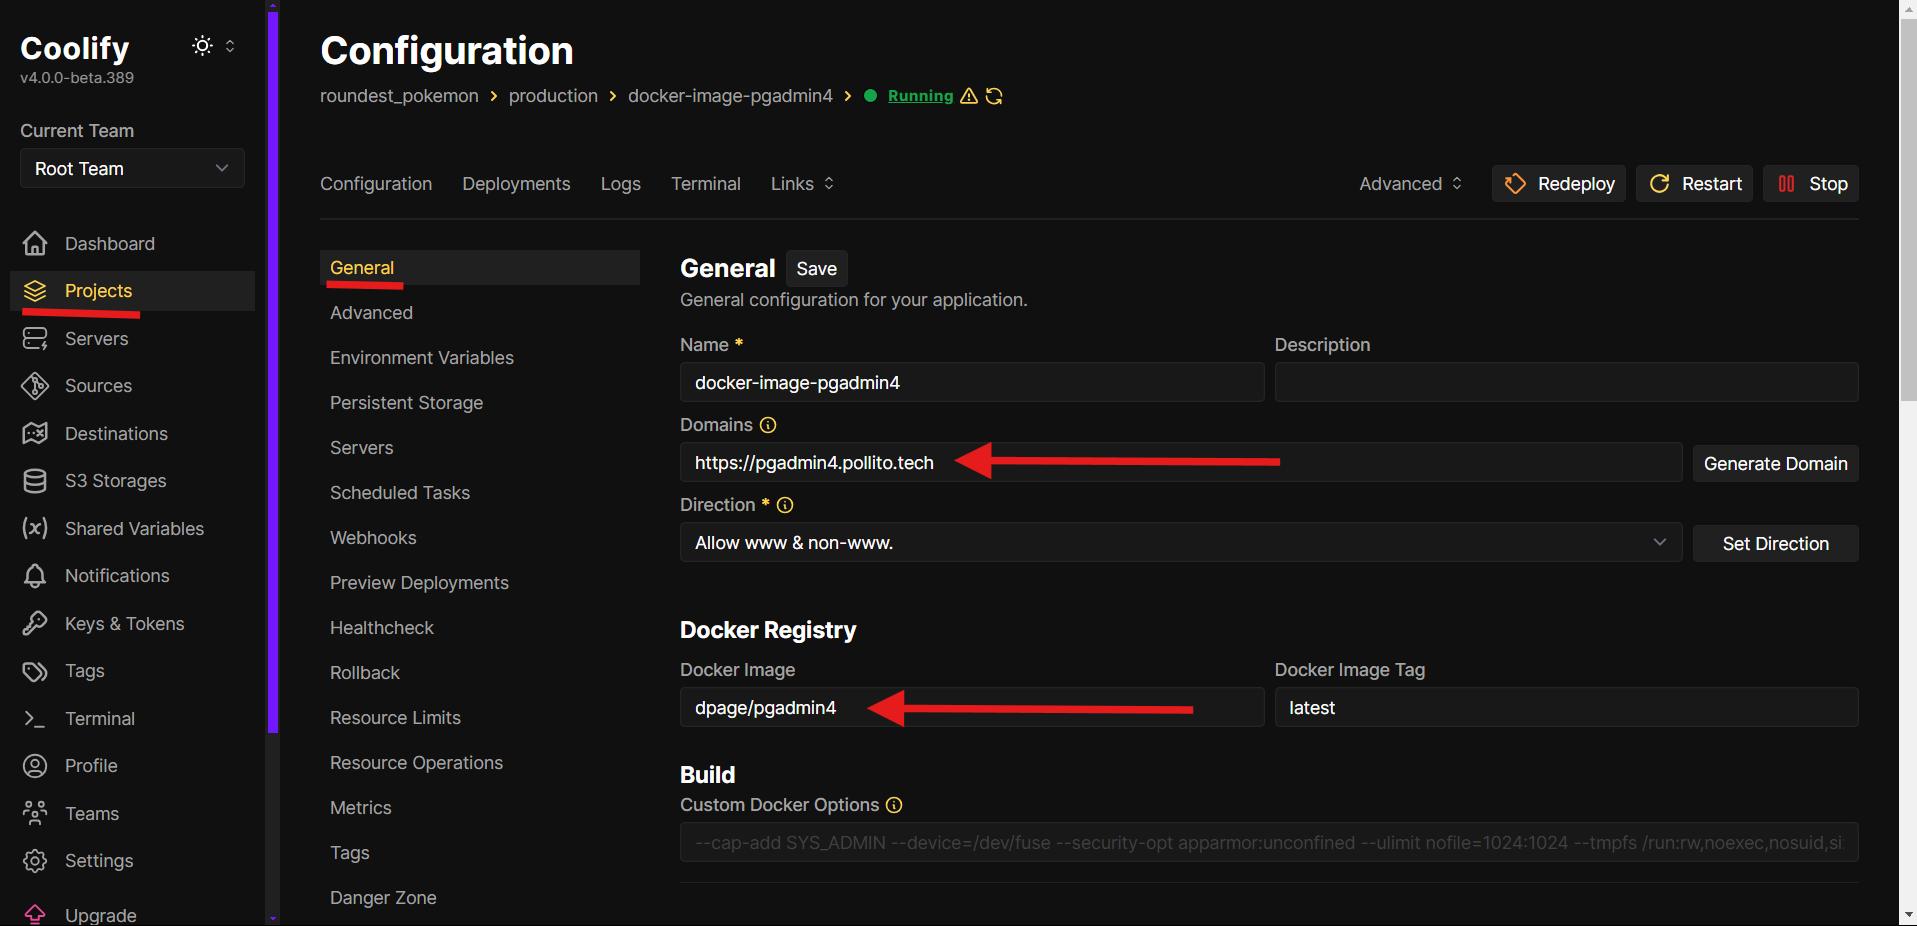
-
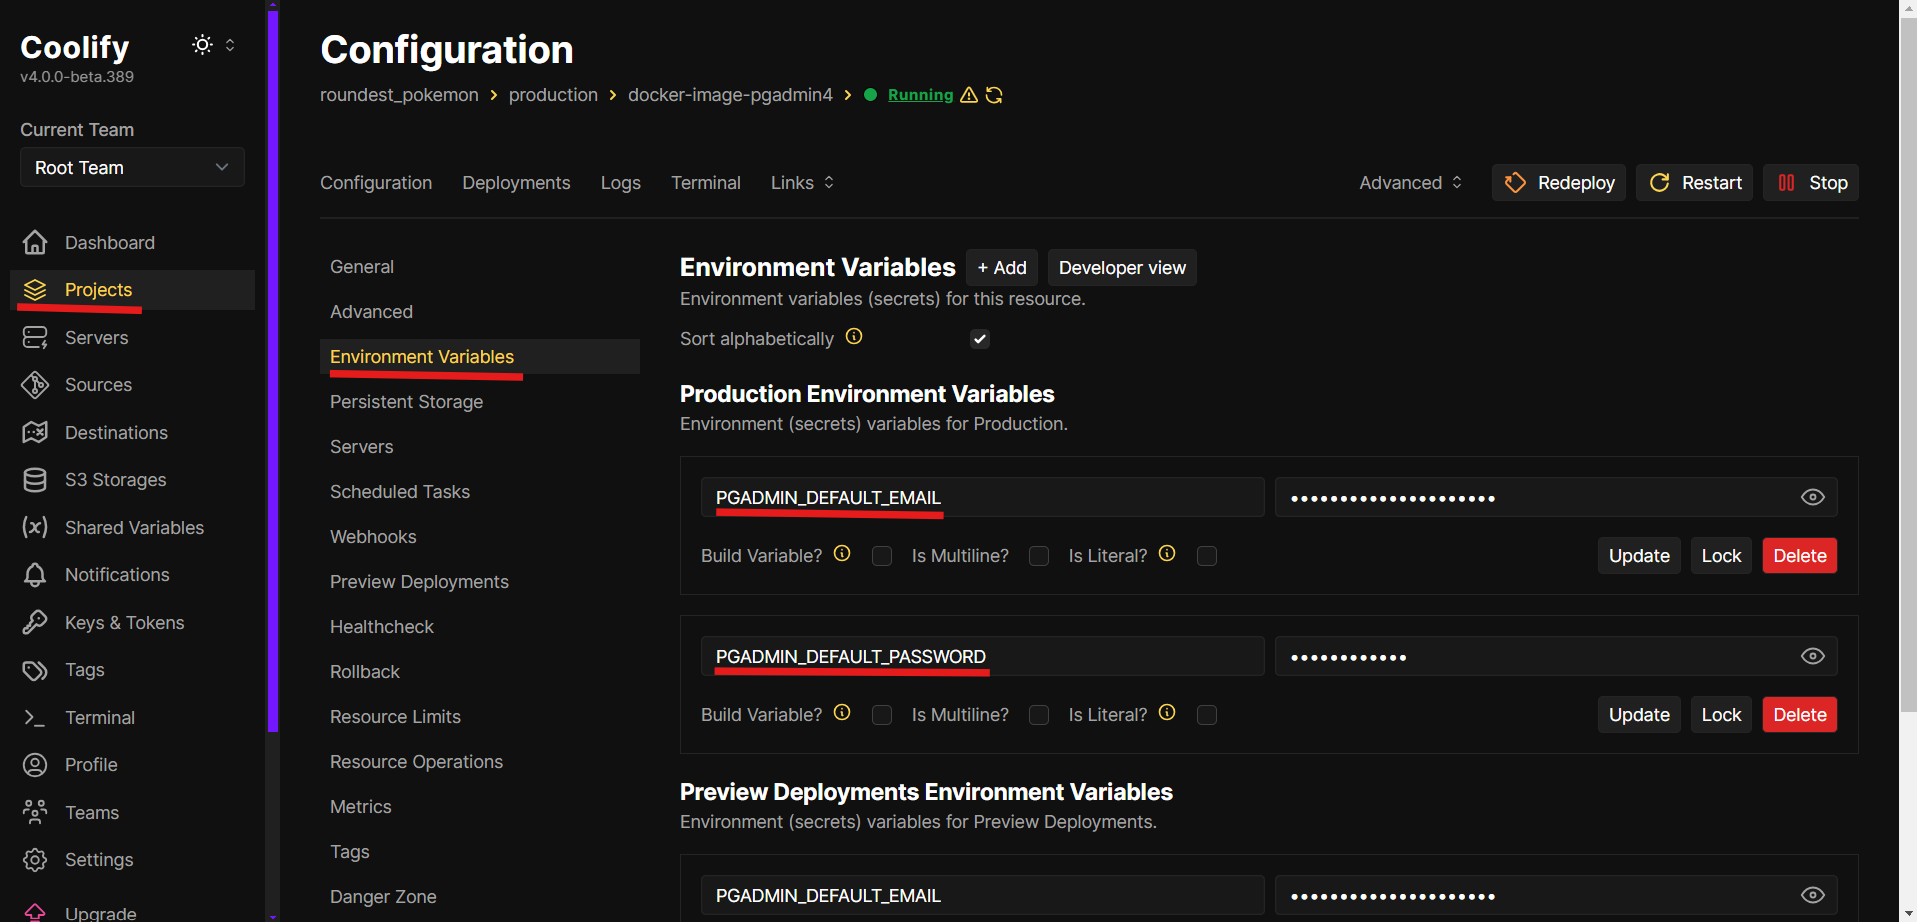
In Enviroment Variables add the credentials you will use to log into pgAdmin:
PGADMIN_DEFAULT_EMAILPGADMIN_DEFAULT_PASSWORD(keep it alphanumerical, not symbols)
Add A New Server
-
Go to
pgadmin4.yourdomain.comand log in with the credentials you put into thedpage/pgadmin4environment variables. -
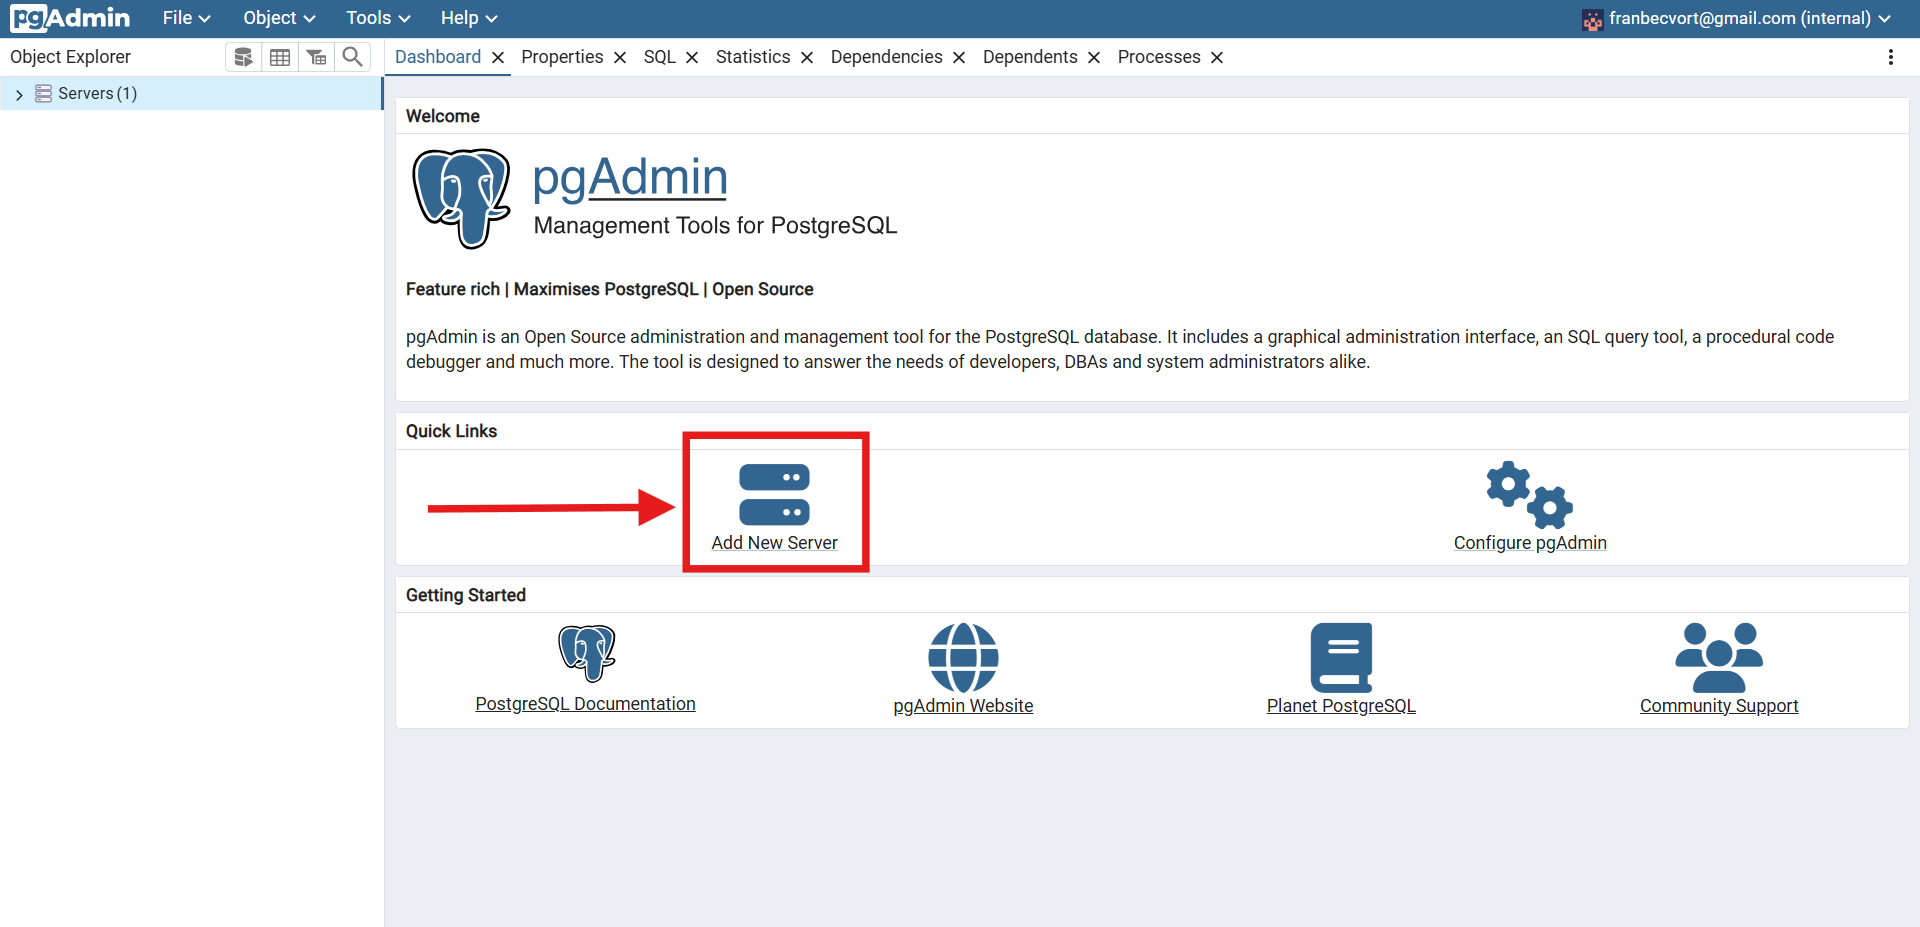
Once in, go to Add new server.
-
In General, you can give it any name you want
-
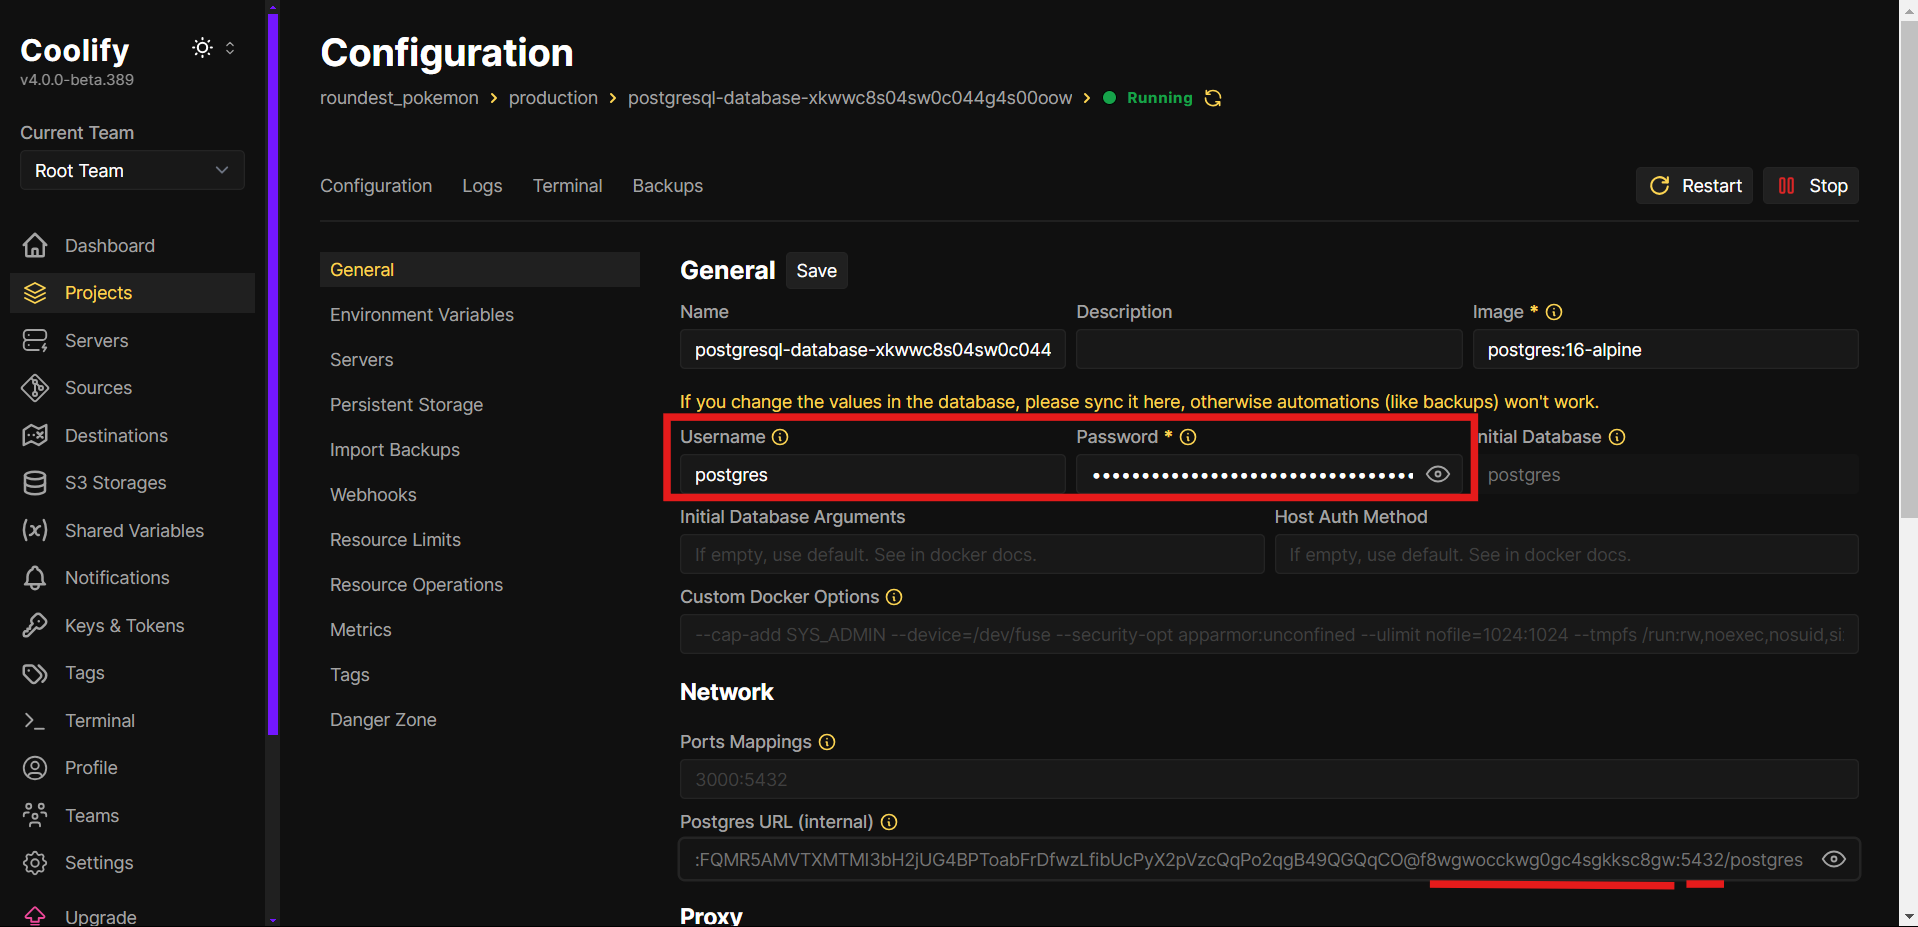
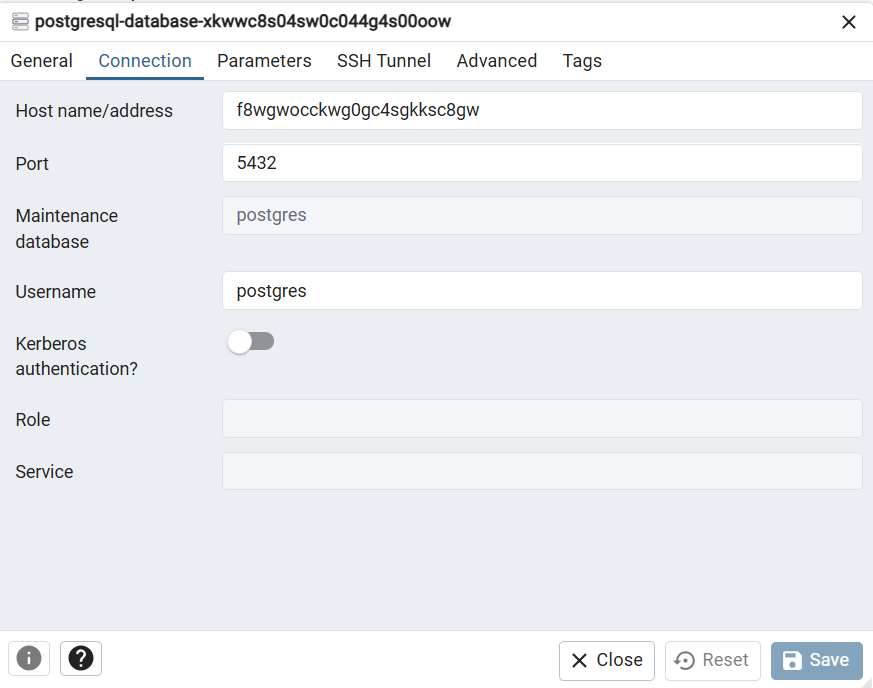
In Connection, you need to fill:
- Host name/address: the hostname from the PostgreSQL internal URL (is between
@and the:5432). - Port: by default is
5432. - Username: the username from the PostgreSQL.
- Host name/address: the hostname from the PostgreSQL internal URL (is between
-
On save, you’ll be asked the password.
Now you are able to execute queries to the database while keeping it safe inside the internal network.
Populate Initial Data
-
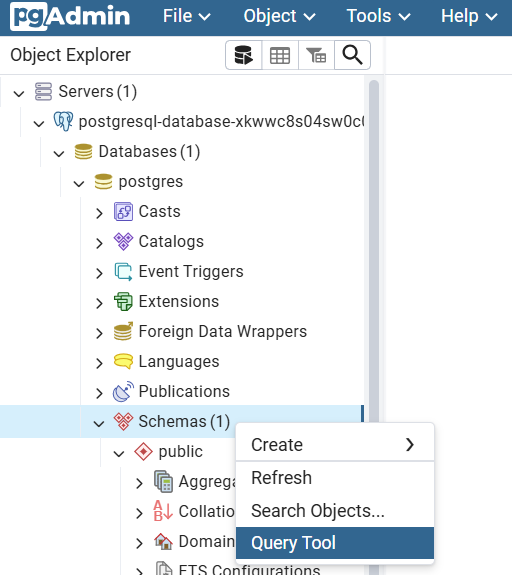
In the left sidebar, under Servers → the server you just added → Databases → Schemas, right-click and select Query Tool. That will open a Query console.
-
Paste and execute this SQL script that creates a table for the Pokémon + inserts the first generation Pokémon with initial zero votes.
-
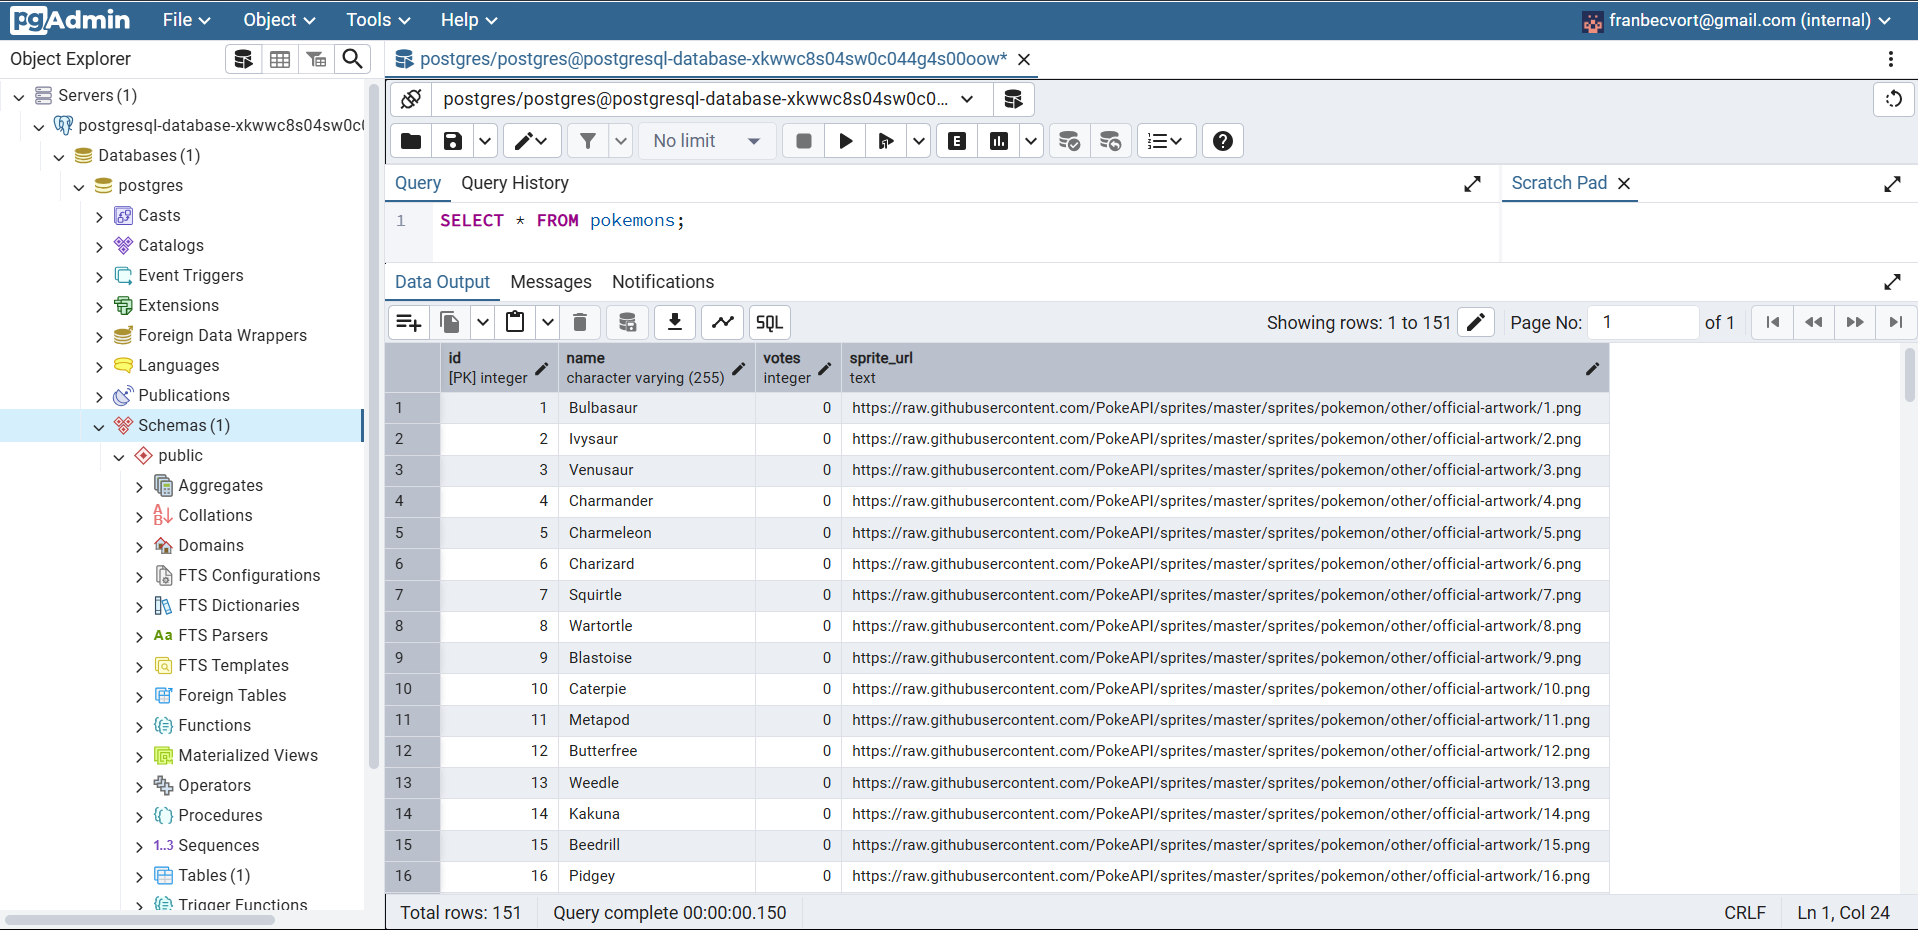
Retrieve the created data to check everything is OK.
SELECT * FROM pokemons;
Create A Specific User For Your Application
Creating a specific user for your application (instead of using the default postgres superuser or other admin accounts) is a security and operational best practice.
Let’s create a user for with access limited to the public schema:
-- Create backend_app_user
CREATE USER backend_app_user WITH PASSWORD 'your_secure_password_here';

-- Grant Basic Connection Permissions
GRANT CONNECT ON DATABASE postgres TO backend_app_user;

-- Grant Schema Permissions
GRANT USAGE ON SCHEMA public TO backend_app_user;

-- Grant Table Permissions: For existing tables
GRANT SELECT, INSERT, UPDATE, DELETE ON ALL TABLES IN SCHEMA public TO backend_app_user;

-- Grant Table Permissions: For future tables (default privileges)
ALTER DEFAULT PRIVILEGES IN SCHEMA public
GRANT SELECT, INSERT, UPDATE, DELETE ON TABLES TO backend_app_user;

-- Grant Sequence Permissions: For existing sequences
GRANT USAGE, SELECT ON ALL SEQUENCES IN SCHEMA public TO backend_app_user;

-- Grant Sequence Permissions: For future sequences
ALTER DEFAULT PRIVILEGES IN SCHEMA public
GRANT USAGE, SELECT ON SEQUENCES TO backend_app_user;
Create A GitHub Application In Coolify
Why?
- To deploy private repositories.
- To enable automatic deployments via webhooks.
How?
-
Access Sources in Coolify:
- Navigate to Sources in your Coolify dashboard.
- Click Add to create a new GitHub application.
-
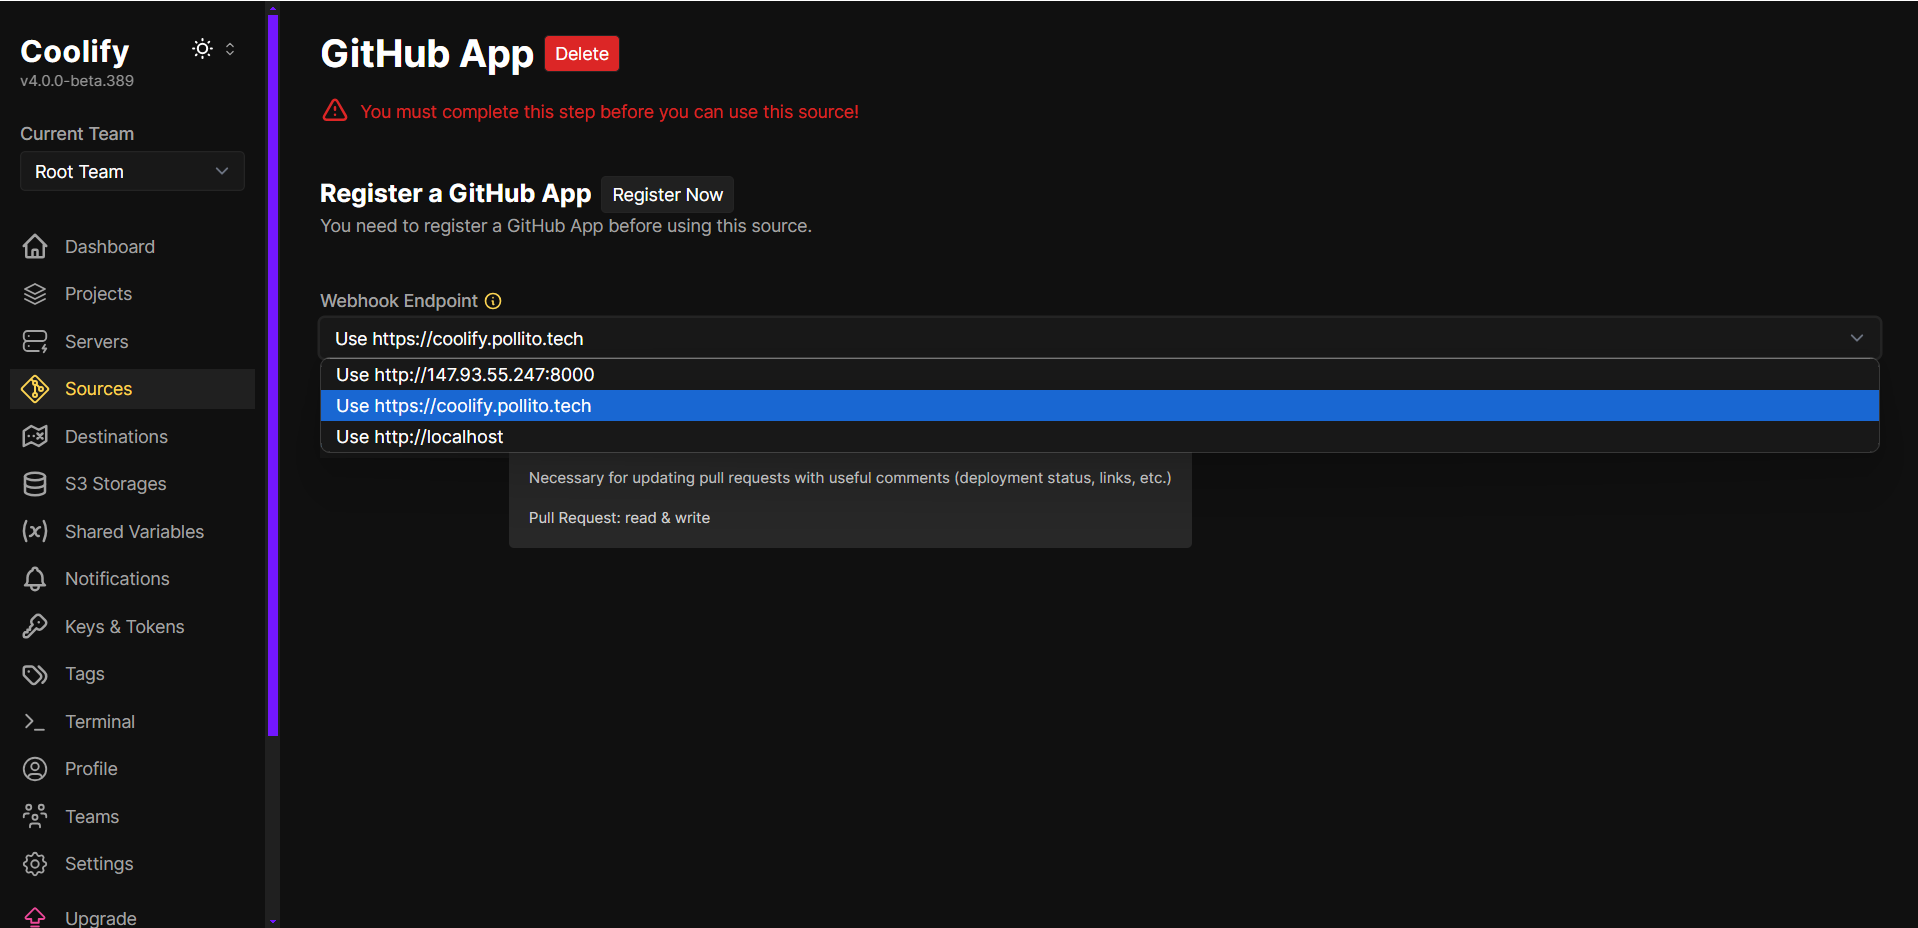
Configure the GitHub Application:
- Provide a unique name for your GitHub app (e.g.,
coolify-pollito-tech). The name is globally unique across GitHub. - Set the Webhook Endpoint to your Coolify instance’s HTTPS URL (HTTP may cause webhook delivery issues).
- Click Register Now to proceed to GitHub.
- Provide a unique name for your GitHub app (e.g.,
-
Configure Repository Access on GitHub:
- Follow the principle of “least privilege”, only grant access to repositories you plan to deploy.
- Click Install to finalize the GitHub app setup.
-
Verify Permissions in Coolify:
- Return to Coolify and click Refetch to confirm the GitHub app has the correct permissions.
- A successful configuration will show the app has access to your selected repositories.
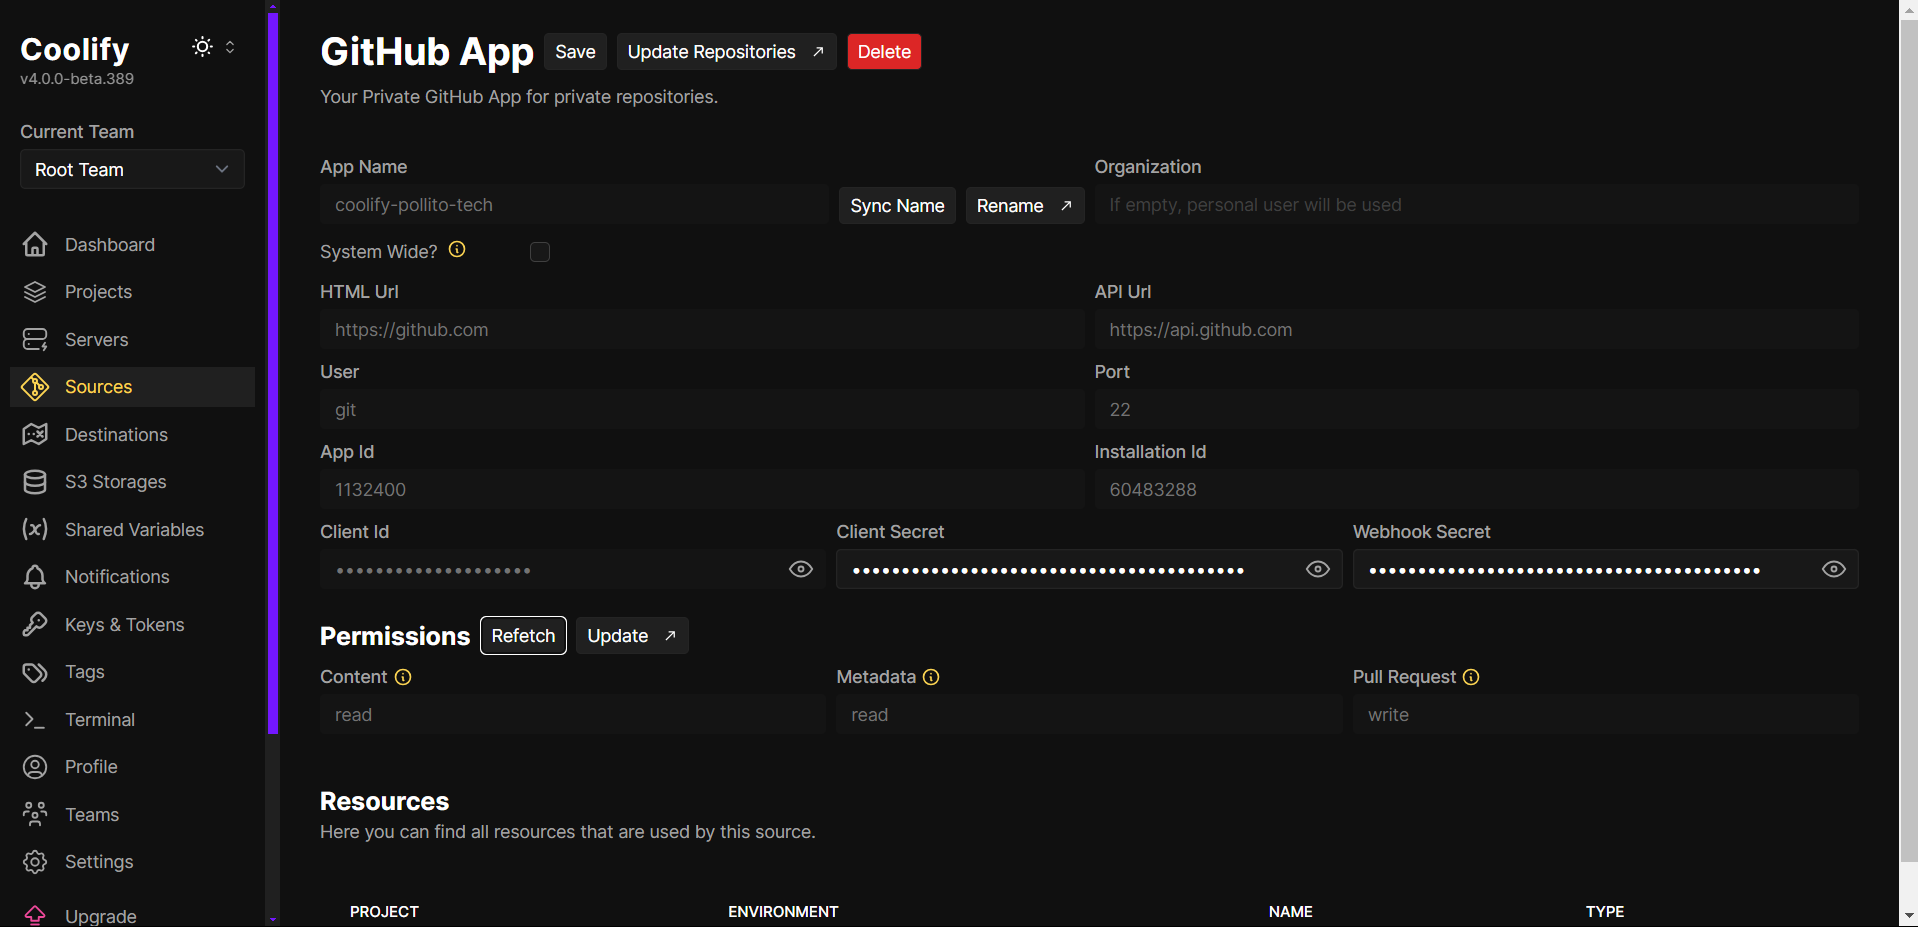
To add new repositories later, click Update Repositories. This redirects you to GitHub, where you can update repository access.
Deploy Using GitHub App
Spring Boot
Let’s deploy one of the backend applications.
- Go to your “roundest_pokemon” project.
- Crucial to be inside the same project, if not, the application will not be able to reach the already created database.
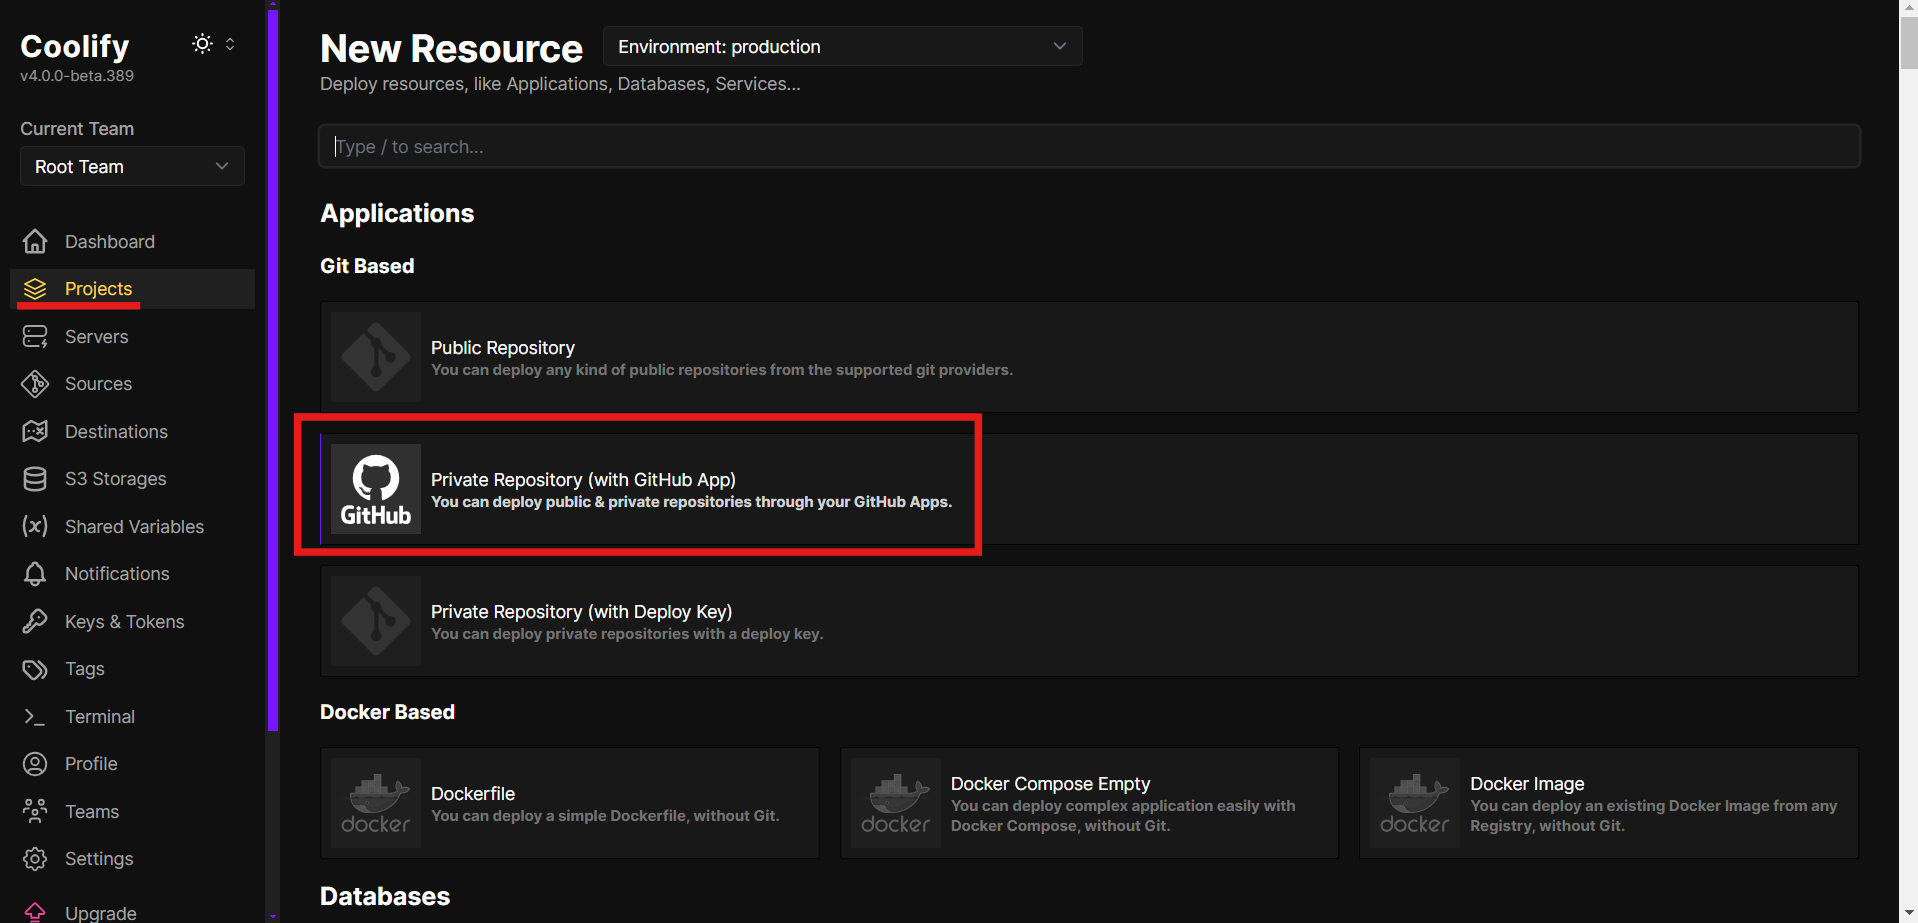
- Click + New.
- Under Git Based, select Private Repository (with GitHub App).
- Choose the repository containing the application.
- You can leave everything else as default, as you can configure it in the following step.
- Configure Application Settings:
- Application Type: This repo counts with a Dockerfile that I personally battle tested a bit and so far seems to work fine. So let’s select Dockerfile.
- Add your custom domain (e.g.,
app.your-domain.com)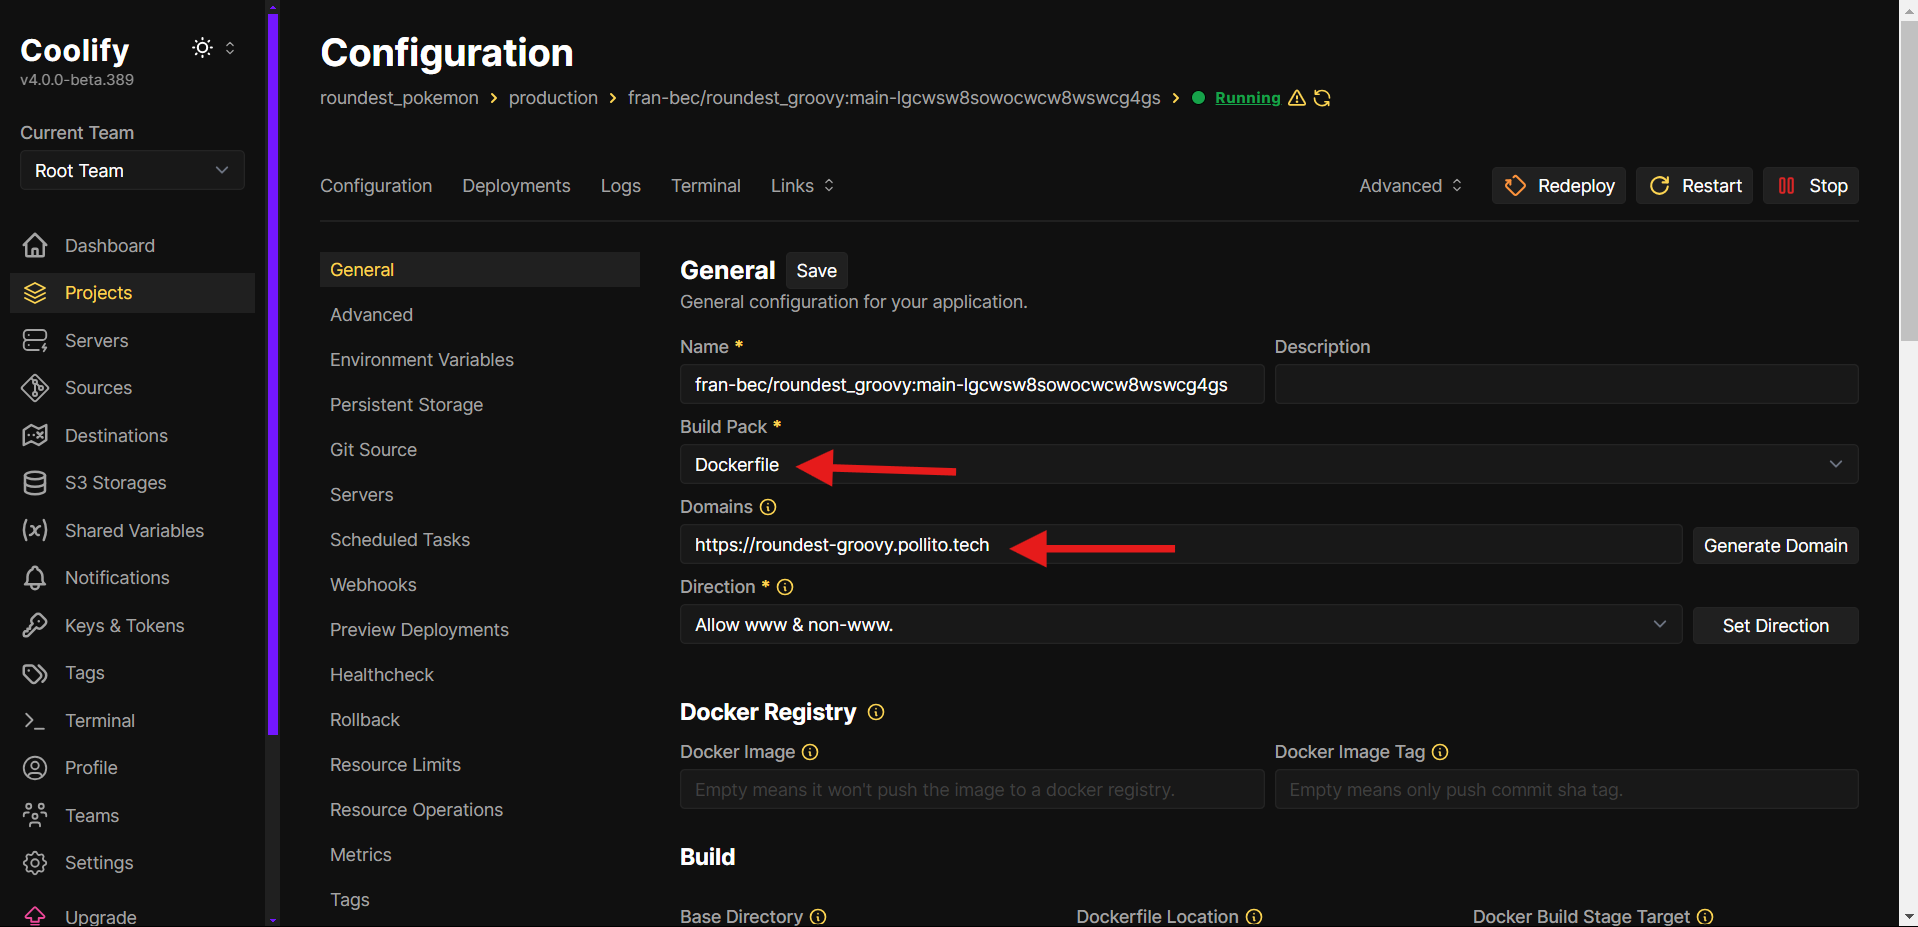
- By scrolling a little bit, you’ll find the Network section. For these backend apps, in Ports exposes set
8080. The port can vary between different types of apps.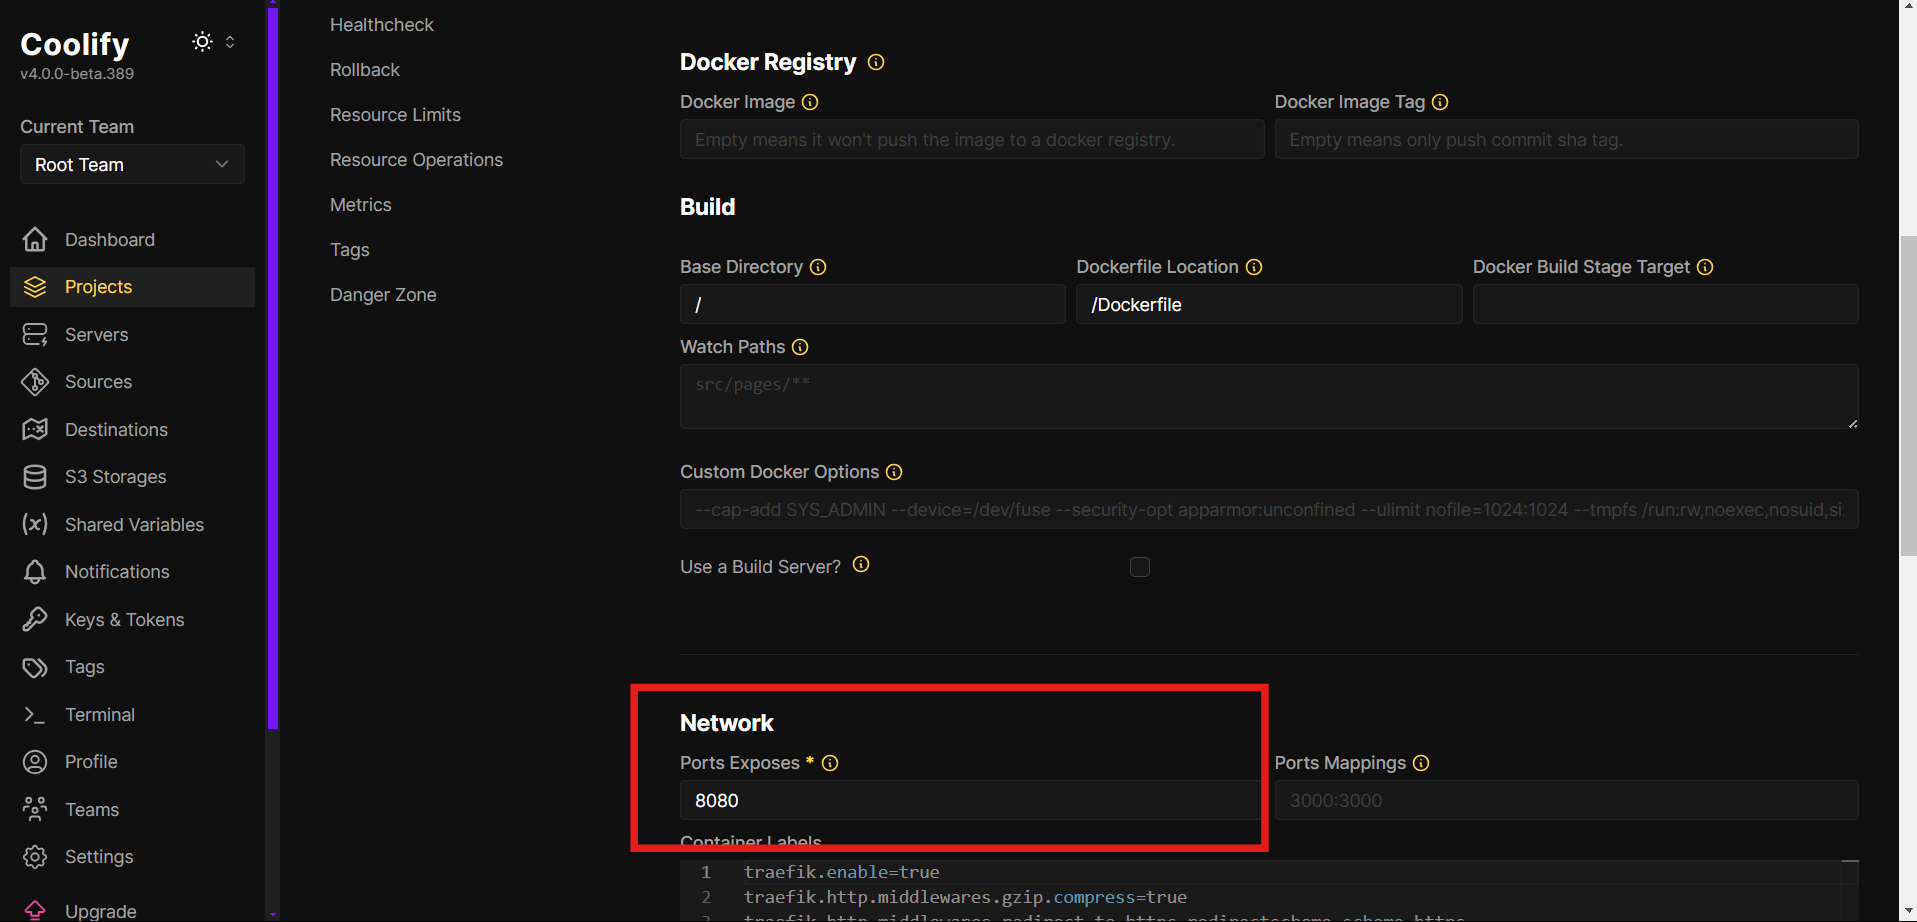
- In Environment Variables add all those that the app needs. In this particular app, I need the database host, port, db, username, and password. Remember to use the specific database user-password we created earlier.
- Deploy, Coolify will:
- Clone your repository.
- Build the Docker image using your Dockerfile.
- Deploy the container with your configured domain and environment variables.
Visit https://app.your-domain.com to confirm the app is live.
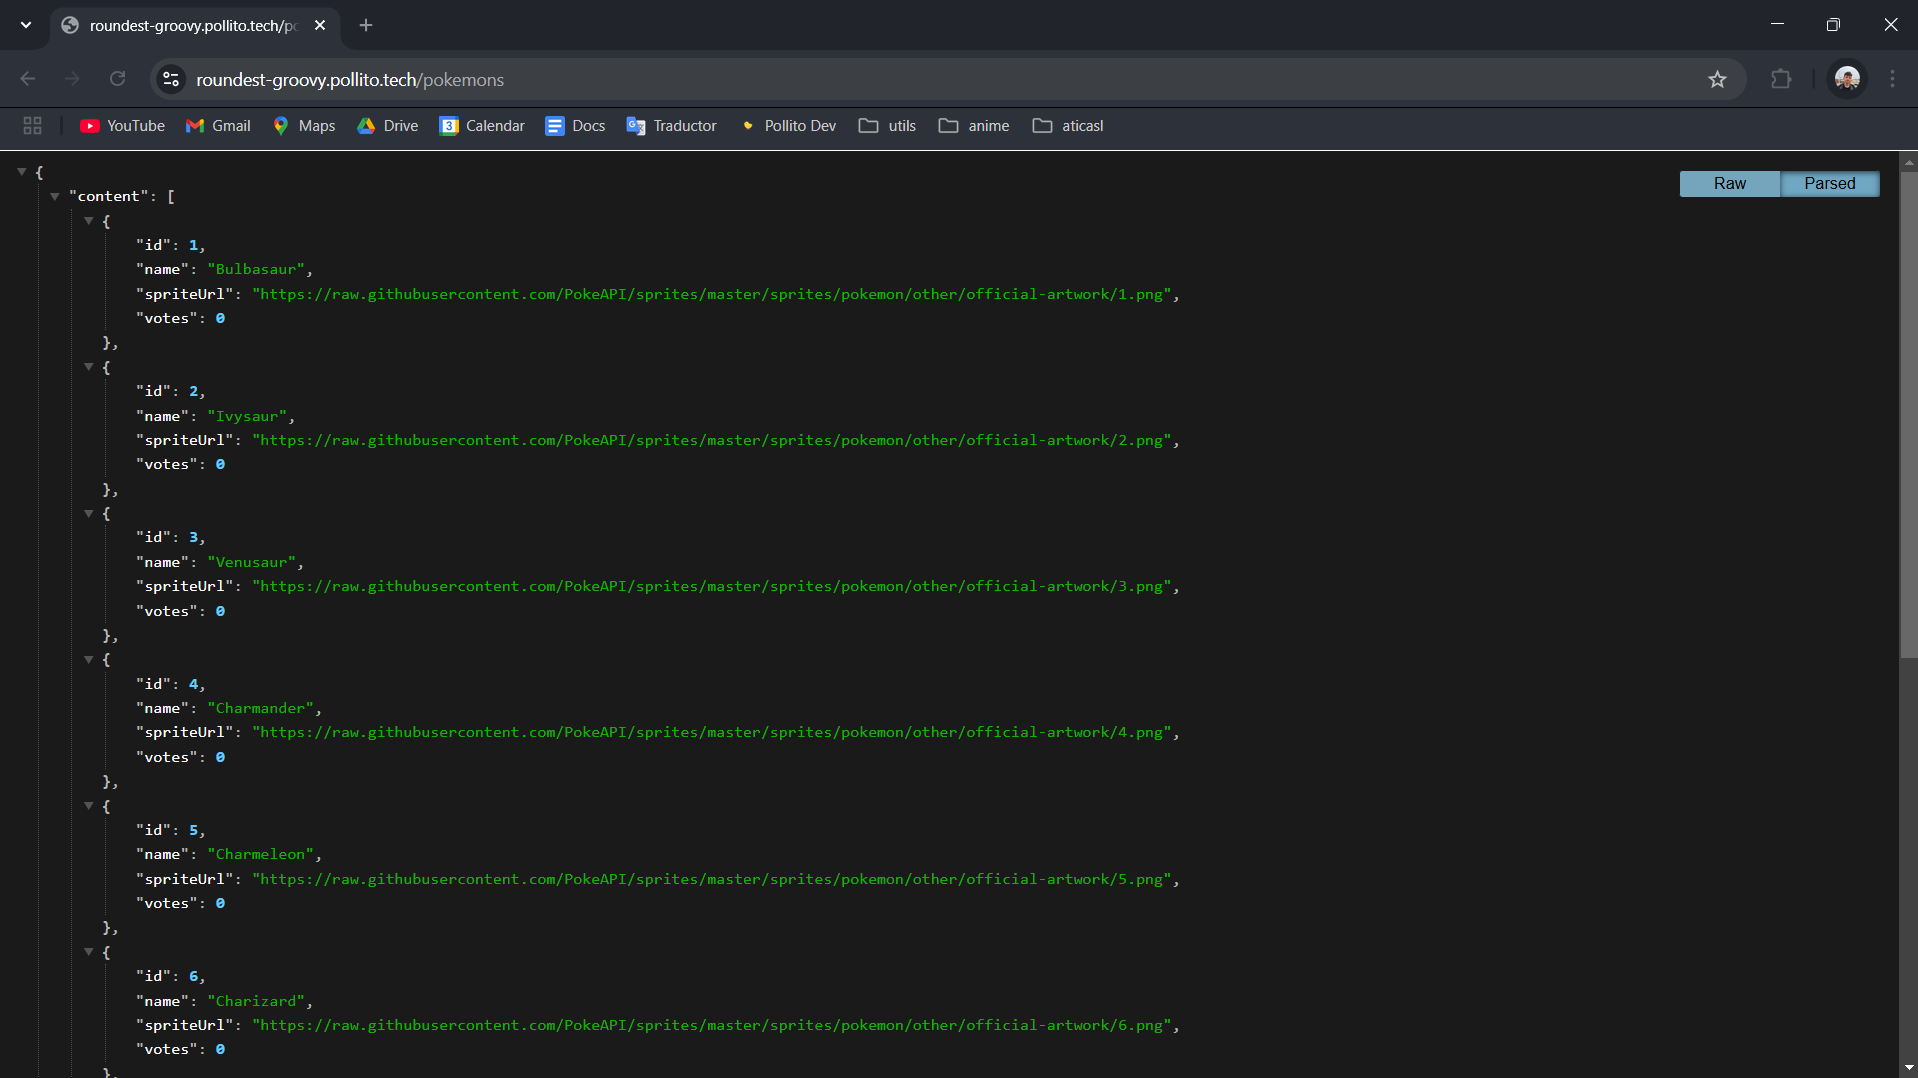
Dance and repeat for all similar Spring Boot apps.
Next.js
The deployment process for Next.js applications is nearly identical to the Spring Boot backend, with one key configuration change:
- Go to your project (e.g., “roundest_pokemon”).
- Same project requirement applies; this ensures the frontend can communicate with backend services.
- Click + New → Private Repository (with GitHub App).
- Select your Next.js repository.
- Configure Application Settings:
- Application Type: Select Nixpacks . It automatically detects Next.js and handles build optimizations.
- Add your frontend domain (e.g.,
vote.your-domain.com).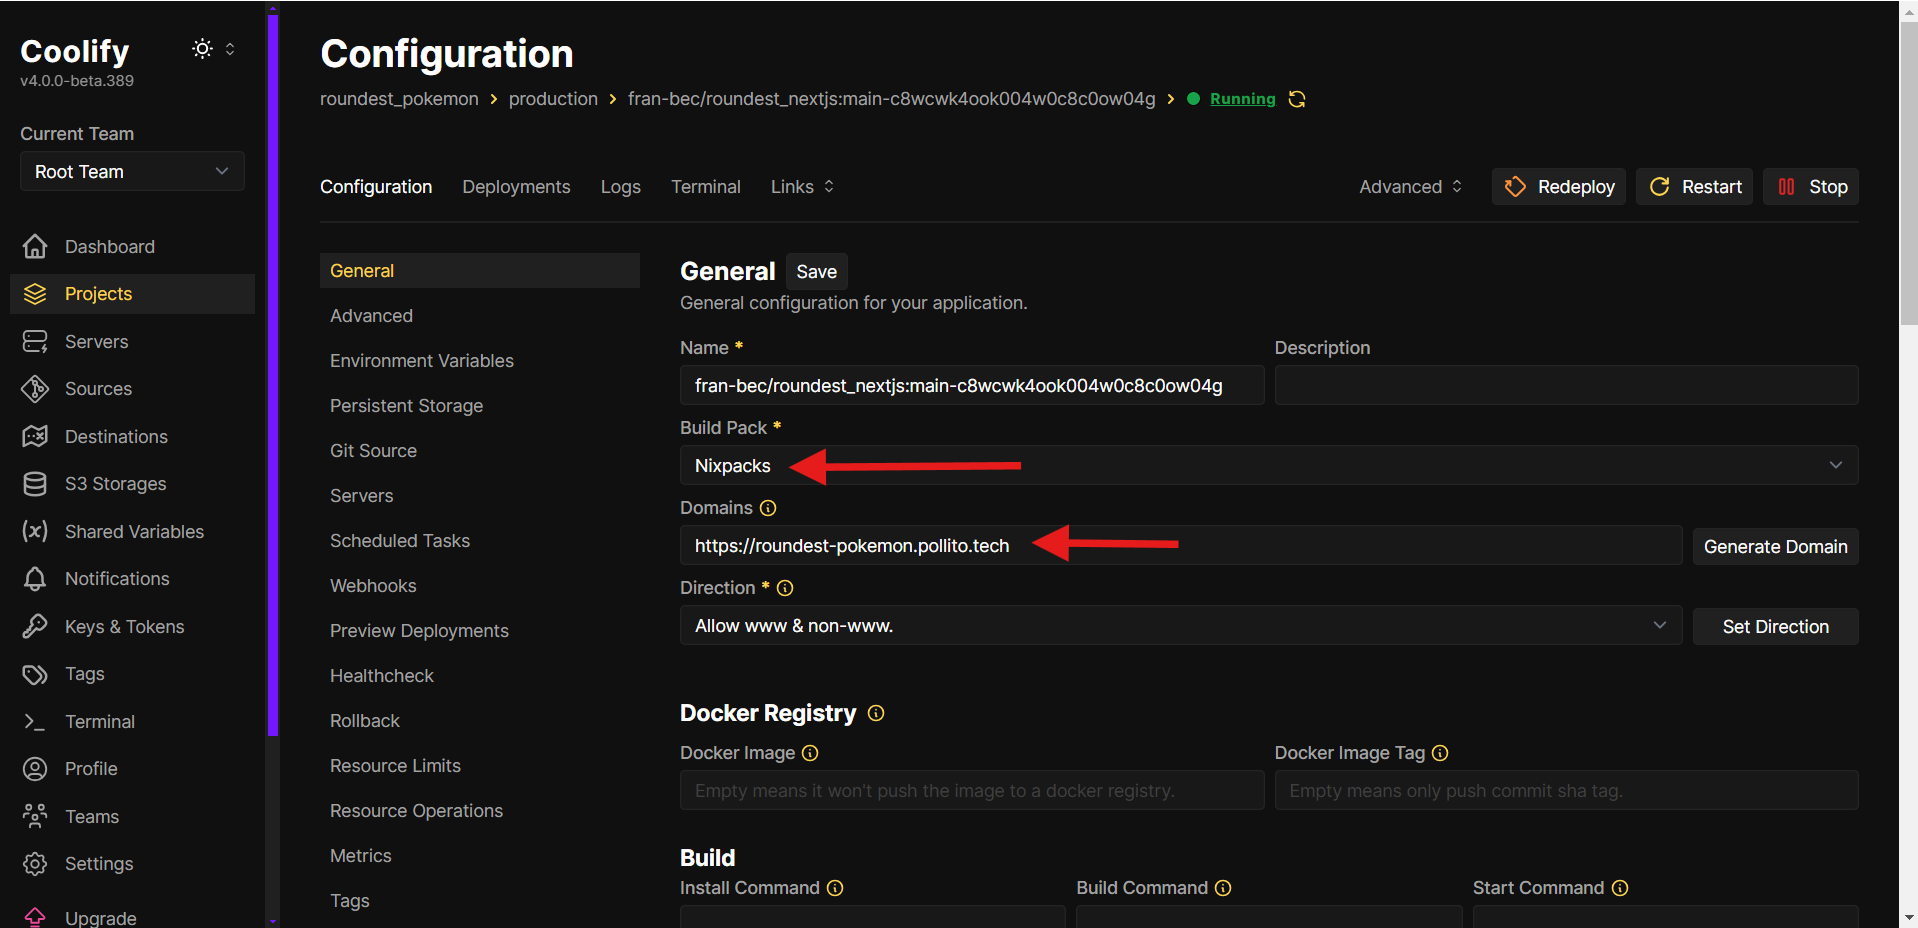
- In the Network section: Set exposed port to
3000(default Next.js port).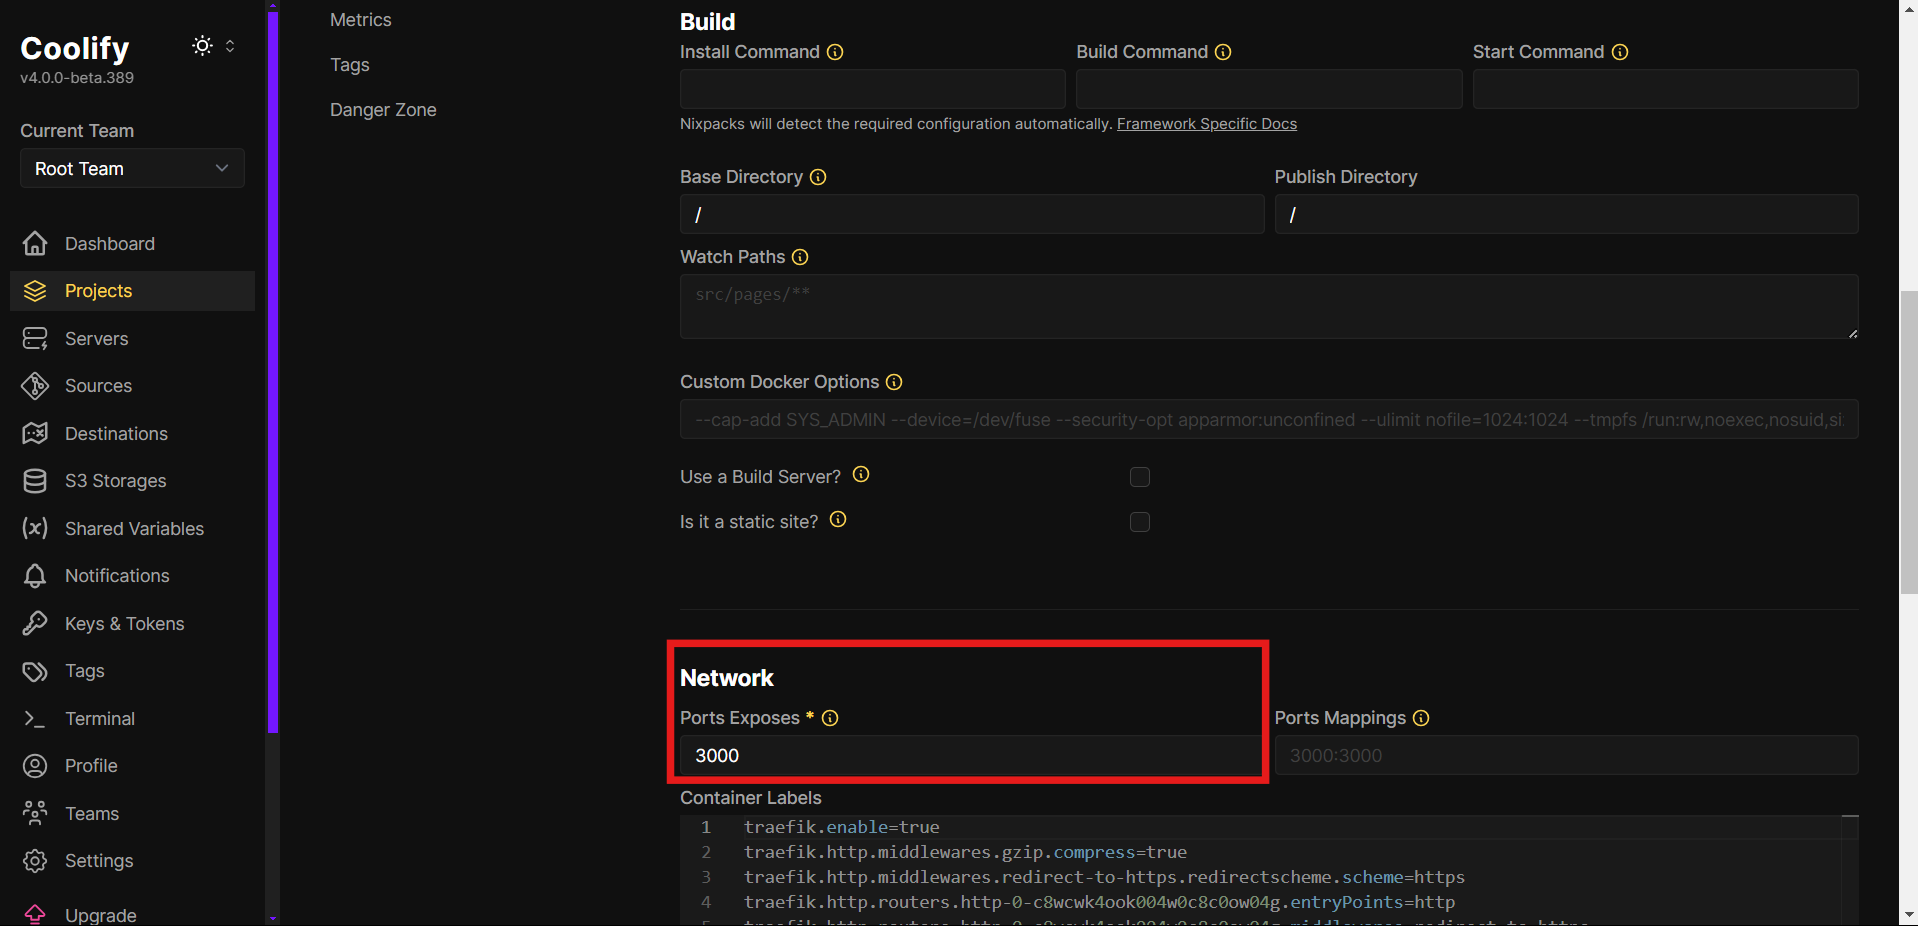
- Add any required Environment Variables.
- Deploy.
You may interact with my final result here . I don’t promise to keep it up forever, as I may use this VPS for another project that may need the computer power.
VPS Resource Usage
This screenshot captures the VPS running on idle, showing various resource metrics.

Let’s remember this VPS is running:
- A Next.js app.
- A Java app.
- A Kotlin app.
- A Groovy app.
- A database (Postgres).
- A databse manager (pgadmin).
- Glances (monitoring).
- Coolify, the admin panel from where we manage the apps.
System Overview
- CPU: The system is using around 8.1% CPU, with most usage coming from background processes.
- Memory: 34.3% of RAM is in use, with some swap space allocated but not actively used.
- Load Average: The system load remains low, with a 15-minute average of 0.26, indicating minimal activity.
- Disk I/O: No significant read/write operations happening, meaning no heavy disk usage.
- Network: Minimal network activity, with only a few kilobytes of data being transferred.
Container And Process Activity
- Multiple Docker containers are running, but they are mostly idle.
- The highest CPU-consuming processes include:
python3runningglancesfor monitoring.dockerdmanaging containers.- Background services like
redis-serverandphp-fpm, needed for Coolify javaprocesses (the backend systems).
Critical Alerts
The system has logged high CPU usage alerts in the past due to java, python3, and dockerd. This was during deployment of the backend services.
A Heartfelt Conclusion To The VPS Journey
This has become my favourite series of blogs I ever wrote.
I want to take a moment to reflect on how far we’ve come together. When we first asked, “What is a VPS?”
- In Part 1, we acknowledged the allure of serverless while embracing the value of having control over your own server. You don’t need to build the next Facebook to deserve infrastructure that’s reliable, flexible, and yours.
- In Part 2, we rolled up our sleeves and built a foundation: choosing a provider, hardening security, and laying the groundwork for everything to come. It wasn’t glamorous, but like planting a tree, it set down roots for growth.
- Then came Part 3, where Coolify entered the stage, transforming our VPS from a blank canvas into a powerful toolkit. With proxies, HTTPS, and firewalls, we turned complexity into simplicity, proving that modern server management can be both robust and approachable.
- Part 4 brought our server to life with Glances, a real-time dashboard secured by Caddy.
- Finally, in Part 5 we deployed a full-stack app with a database.
This series is about the joy of crafting a space that’s entirely yours free from the whims of opaque cloud pricing or one-size-fits-all solutions. It is about quiet confidence: knowing that even if your app stays small, it’ll run smoothly, securely, and on your terms.
As you move forward, remember that every expert was once a beginner hitting ssh for the first time. Your server is a companion, not a critic. Experiment, break things (then fix them!), and celebrate the milestones, whether it’s nailing a firewall rule or deploying that first app.
If you’ve followed along, you’re now equipped not just with a VPS, but with the knowledge to shape it into whatever your projects demand. Keep tinkering, keep learning, and most importantly, keep building things that matter to you.

I wish you a happy hosting! ~Pollito <🐤/>

